
Contents
- Purpose of the program
- What does a generator do, what functions does it perform?
- Why is Ceres a must-have right now?
- System requirements
- Description of the PDF creation algorithm
- Description of program settings
- Description of input data files
- Description of generator macros
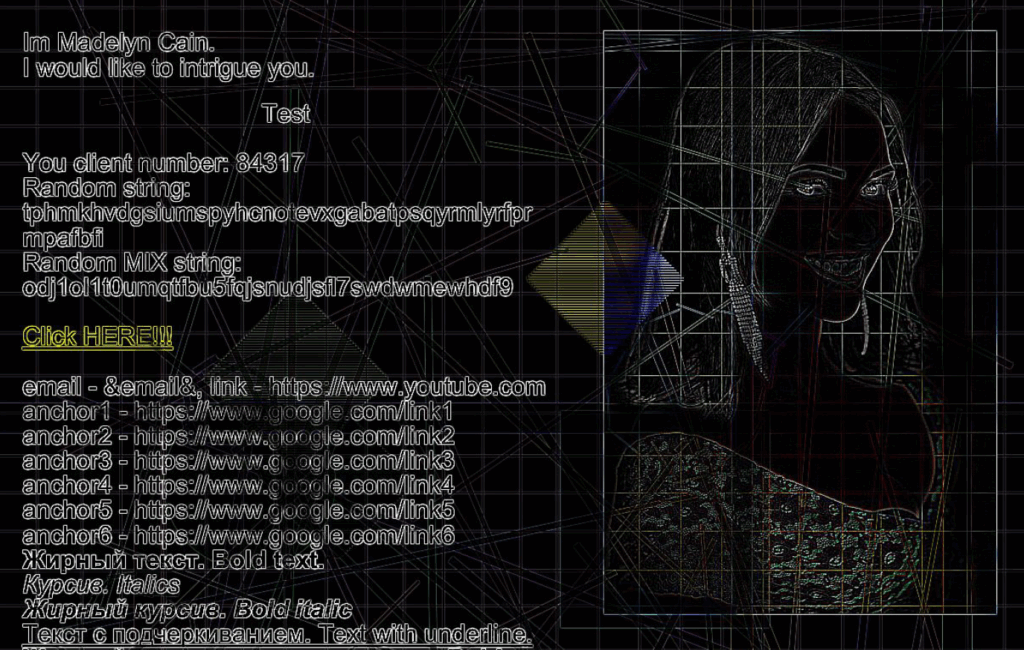
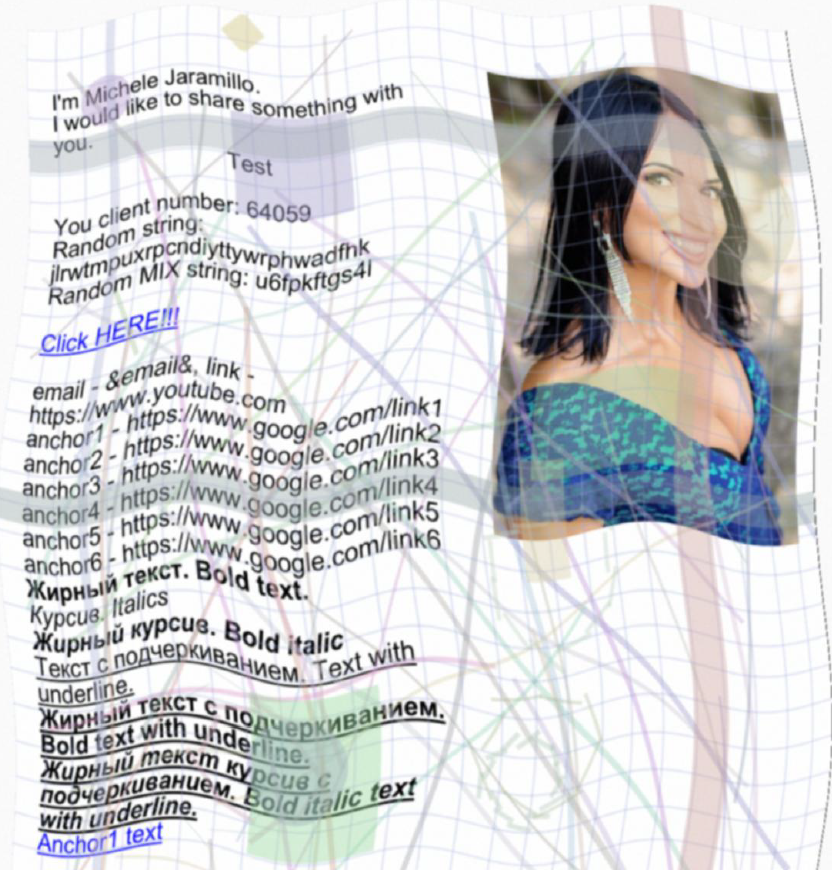
- Description of input text and examples of acceptable HTML markup
- Integrating Ceres into workflows and configuration management
- Using CERES in conjunction with AMS Enterprise
- Terms and conditions of purchase and use
- Program registration and activation
- FAQ – Frequently Asked Questions
Purpose of the program
The Ceres generator is designed to create unique PDF files automatically. These PDFs can then be used in white and other color mailings. Mailings can be sent in various ways (email, messengers, social networks, etc.). It combines the maximum possible randomization capabilities (to confuse email and messenger analyzers and increase your inbox) and personalization of your offer to the recipient (to increase the trust of the end recipient and generate mailing statistics on your TDS) based on a preloaded database with email addresses and 13 additional fields. By the way, personalization in PDF text can also have a positive effect on the inbox in theory. The program has many customizable parameters that affect both the appearance and structure of the PDF files created.
At the time of release, the author is not aware of any functional analogues 🙂
The PDF files you receive can be used:
- For mass mailings (to confuse email analyzers, make attachments as dissimilar as possible, and hide the real link among others);
- To collect responses and identify the “active, clicking” part of the database after one or more mailings. Using a personalized link from the recipient’s email and processing it in your TDS;
- To segment existing validated databases by interest by embedding 1 main and 6 additional links. These links can be assigned to both text and images (1 main + 4 additional links). Something like A/B testing within a single PDF.
- To create a “Showcase of offers” within a single PDF file – when each additional page has its own link on each individual image, leading to different offers.
- For mailings with other types of responses other than clicking on a link (voice call to a specified phone number, sending an SMS to a specified phone number, scanning a QR code, and maybe you can add something else to this list 🙂
The huge number of adjustable parameters makes it possible to run a bunch of tests to get past email filters, increasing the chances of getting into the inbox. But let’s not forget that any tool just fills the gap between the computer and the seat 🙂
Most of the generator’s settings are provided with tooltips in Russian and English, which will help you quickly navigate them. Before using the generator, it’s essential to read this manual to understand what affects what, how they work, and in what order. The manual also describes all source data files and the macros used—this information is essential for maximizing the generator’s capabilities.
Generator functionality
General capabilities:
- Generation of eleven types of mutual arrangement of images and text on the first page of a PDF file. Automatic random selection of layout options when generating each file.
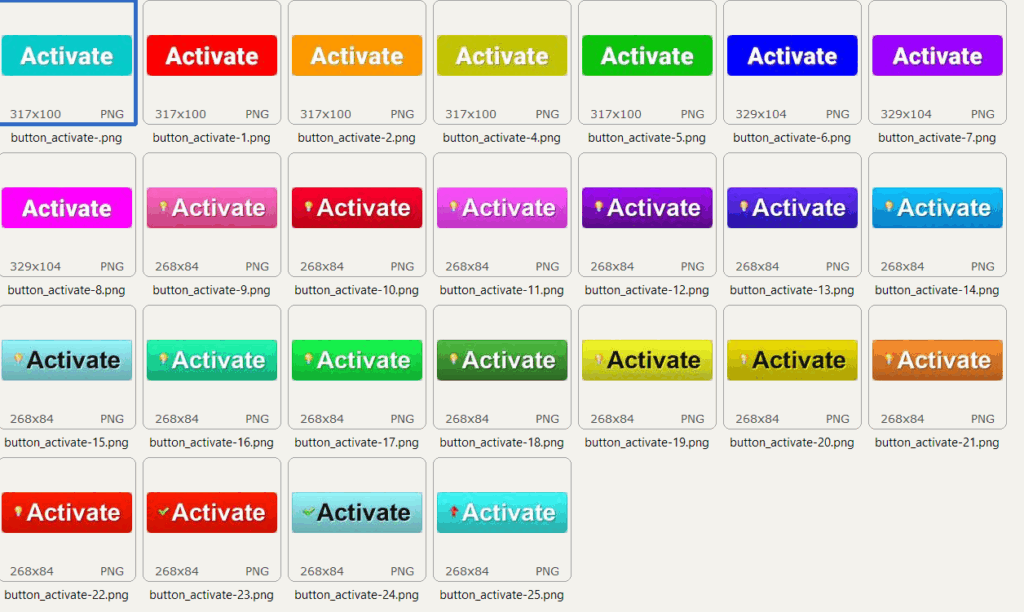
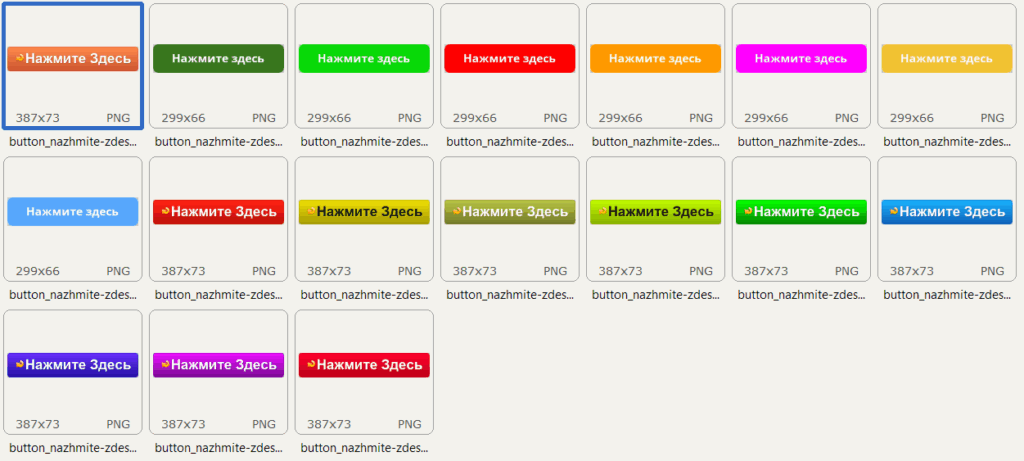
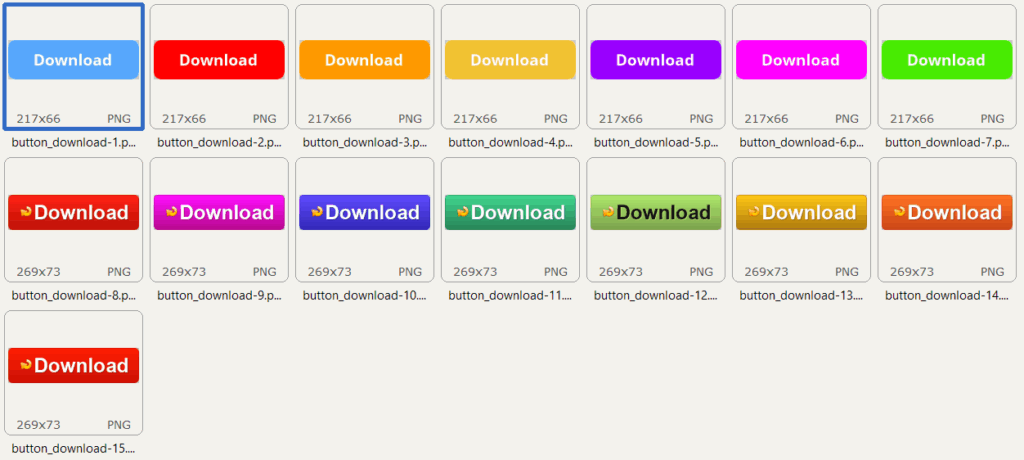
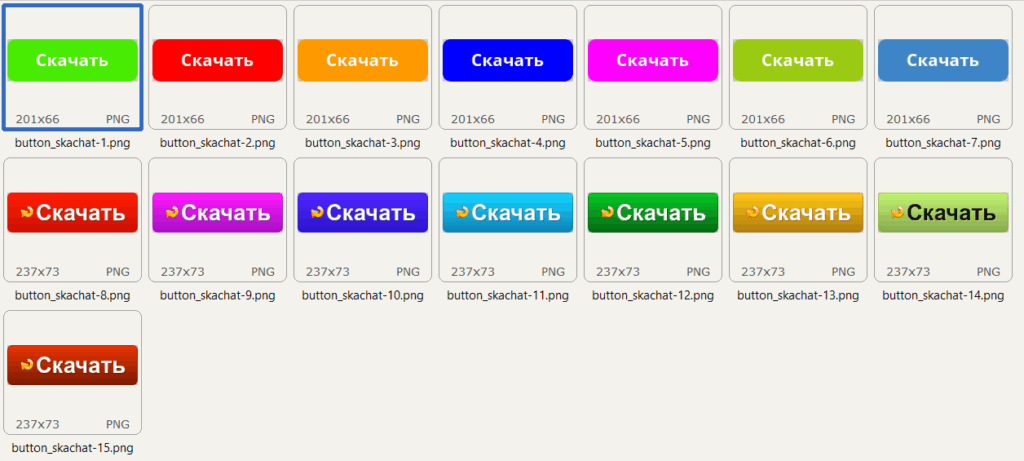
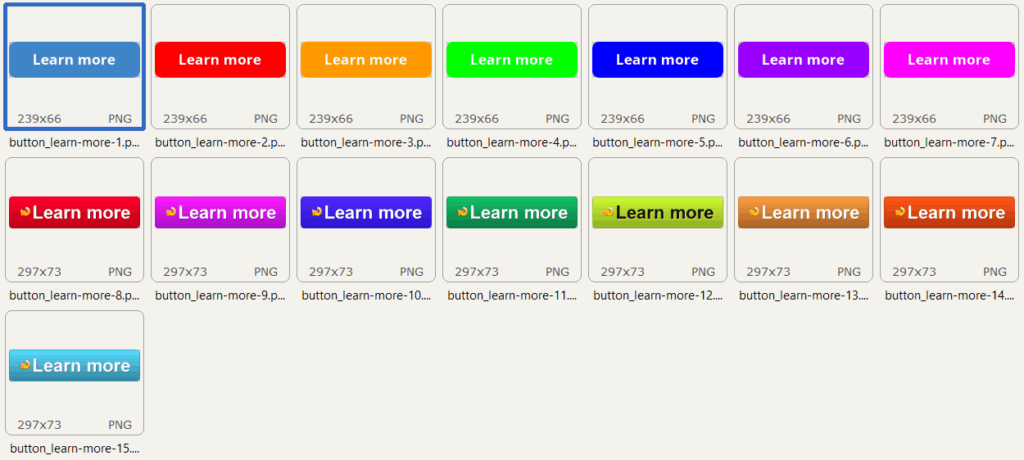
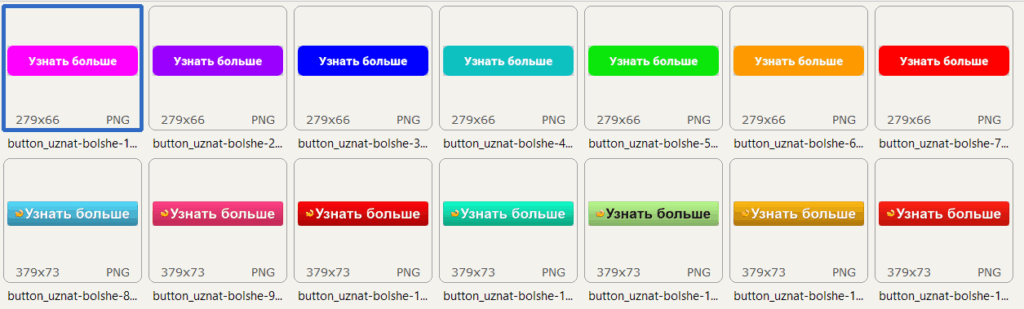
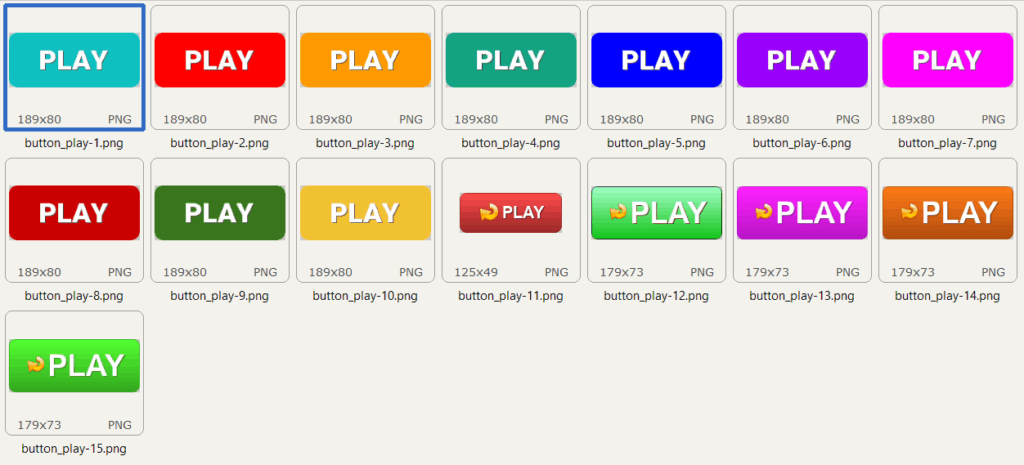
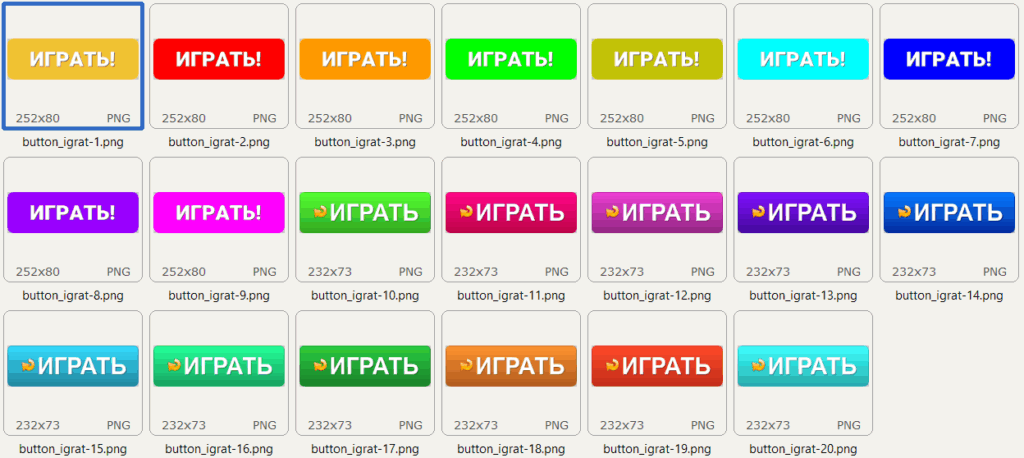
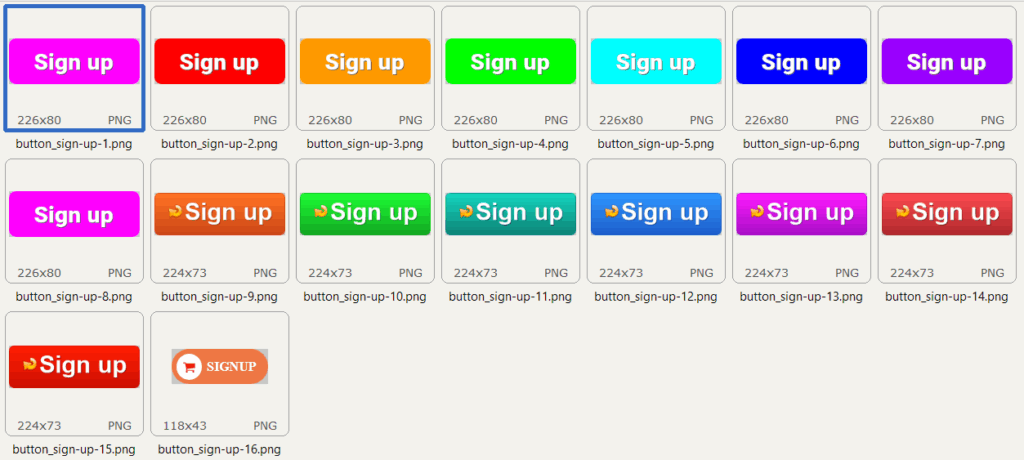
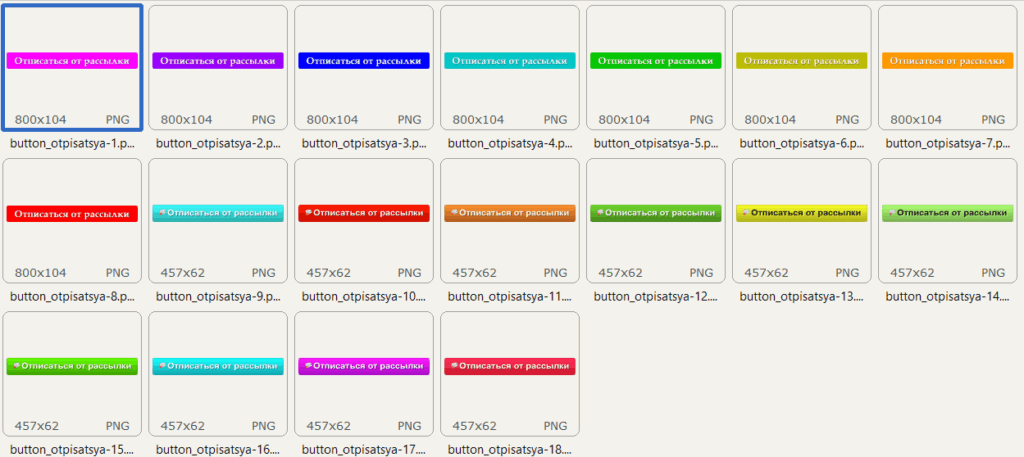
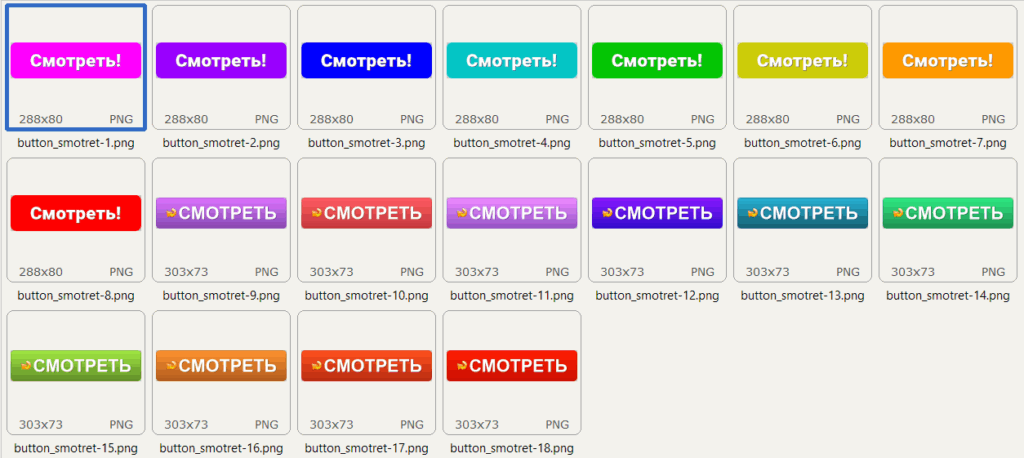
- Automatic addition of user-specified images to the main image. For example, adding call-to-action buttons (“Play,” “Click,” “Watch,” etc.) — so-called CallToAction Buttons (CTA Buttons). The size and position of the overlay button can be adjusted. You can add a button below the main image, or you can overlay it on the main image itself. You can overlay any user images. PNG files with transparency are supported. The generator comes with a set of 317 ready-made CTA buttons. The buttons are available in two languages, English and Russian, and are grouped into 10 thematic sets separately for each language. For a full description of the option, see here.
- A unique option to remove (trim) free (unoccupied) space at the bottom of the first page. Designed for larger visual display of PDFs when viewed in browsers. If the content specified in the template does not fit on one page, trimming is performed on the last page. No other generator I know of has this feature. And most likely, it will not appear anywhere else, as it requires in-depth knowledge of the internal description of the PDF format.
- You can add a single link to the entire first page or separate links to individual page elements (to an image, anchor text, or just in the text). You can also disable the single link and the link from the image (links in the text will remain) to create PDFs that do not require clicking on the link and require a different target action. In the text, you can separately specify all 7 available link types using anchor macros, two of which can be used as sources of additional random text or pre-generated line-by-line numbers and codes.
- Unique processing of each image placed in the PDF using customizable graphic filters. Filter types are configured separately for the first and subsequent pages. Both strict filter specification and random selection for each image are possible. Configuration of the number of filter passes for an image. All this allows you to get an unlimited number of unique photos from 100 input photos and not bother with making photos unique separately when preparing data.
- Ability to add a randomly selected file from a separate folder to the background of the first page. Ability to add a randomly selected file from a separate folder to the background of additional pages. For creating letterheads, reports, and similar documents.
- Dynamic generation of a QR code from a randomly selected main link (the QR code replaces the photo on the first page).
- Option to add a random number of blank pages after the first one (the range of numbers “from” and “to” is customizable).
- Generation of additional pages from 6 different types (17 variations in total, including the option “do not create additional pages”). The number is also determined randomly within a configurable range “from” and “to”. Usually used for masking, but can also carry useful content – see below.
- The ability to use additional pages as offer showcases, where each image has its own link. And the images are not taken from a common pool, but separately for the front page and separately for four positions on the additional pages (see examples of generated PDFs). In other words, we get a kind of segmentation funnel without the hassle of separate landing pages on hosting and VPS.
- Set both fixed page dimensions and the ability to vary them within a specified percentage range when generating each file. The maximum page height has been increased to 99,000 mm, which will allow you to create long single-page PDFs.
- The ability to select colors for the main text, the gibberish text on the first page, and the gibberish text on additional pages separately. With the option to change the color in each file within a specified range.
- Set the font size range for the main text with random selection from it.
- Set the font size range for the gibberish text with random selection from it.
- Customizable indentation ranges before and after the useful content of the first page (including for fitting background images).
- Choice of 8 fonts for each generated PDF. Choice of either a explicitly specified font for all PDFs or a random selection from 8 options.
- For convenience, you can select from a graphical interface 9 working directories and 15 working files + several more source data files that can be modified.
- Generate the output PDF file name in four ways, randomly select from three combinations, and create file names using a template mask with macro and spin syntax support!
- Option to save files each time a PDF is generated in a separate directory with a unique name based on the current date and time.
- Ability to generate both the current file creation time and a random time within a 5-year history + random selection from the list. This time is written inside the PDF. This creation time is also applied to the physical PDF file.
Features for working with text and making it unique:
- The generator understands Spintax in the input file and supports working with multiple source files at once, randomly selecting one of them when generating a specific PDF.
- The input files for the main text support 37 replacement macros of different types: 1) spam word masking macro; 2) email macros for inserting values from the input database fields; 3) file macros for inserting a random string from text files (created by the user, similar in meaning to the variable macros from MailerKing); 4) macros for working with images; 5) macros for current dates in different formats + tomorrow and yesterday, time, year, month, day of the week, etc.; 6) macros for generating random values from letters, numbers, and their combinations (unchanged within a single text and regenerated with each call).
- HTML tags for text formatting (centering, styles – bold, italics, underlining; changing font color and size), the tag for creating hyperlinks “a href=” (for masking the transition address), basic table tags, image insertion, and some others.
- Added the ability to use plain text in input files. To do this, the first line of such a file must contain the macro
&&&text&&&. If this macro is not present, the input text is processed by the HTML parser by default. In plain text mode, you do not need to force line breaks with the <br> code or wrap the text in the paragraph tag <p></p>. Text font formatting, hyperlink insertion (link masking with text), and other HTML attributes will become unavailable. - For mailing to bourgeois and RU, the generator already has ready-made sets of female and male names and surnames, which are available from file macros.
PDF personalization options:
- The ability to add customizable endings to links with the recipient’s email address for subsequent processing of such links in traffic distribution systems (ZTDS, Keitaro, and others) and analysis of those who clicked on these links. A correspondence file is also created with strings of the form: email – pdf file name. Such personalized PDFs must be sent using software that supports attachment personalization. Max Terentyev’s AMS Enterprise, after revision 2.9.17, has this feature (working with AMS is described later in this manual).
- The ability to encode the recipient’s email address in the endings of useful links in Base16, Base32, and Base64 formats to mask the email address. You can also leave the email address in plain text without encoding.
- The ability to use 14 fields from an imported database with email addresses. You can flexibly describe the format for importing the database with emails and then use 18 email macros to insert the values of these fields into your creative. First name, last name, patronymic, city, language, age, address, email, and so on. Any 13 fields + email as the base field.
- When working in SuperLink mode (personalization of links in PDF), you can filter the input database of email addresses and remove those that partially match the stop words contained in the file. There are two ready-made files with stop words: general and general + female foreign names for dating mailings to bourgeois men (to remove potentially female emails containing female names from the database). You can customize the stop word file to suit your needs. However, this option is not suitable for large volumes, as it does not work quickly.
- To name the output PDF, the entire list of file names from the “Output PDF file name” option (6 options) is now available, plus the option to name PDF files according to the corresponding email from the email database file.
Opportunities for masking and confusing mailers:
- A macro has been added to mask text from email clients analyzing PDF content. Text is broken down into parts while maintaining visual integrity. This can help remove spam trigger words (cryptocurrency, crypto, porn, porno, sex, betting, earnings, etc.) from the email client’s field of view. .
- There is an option to add additional masking “junk” text, known as “nonsense text,” at the top, bottom, or both places at once for the first page. Nonsense text can be taken from files (you can use multiple files) or generated automatically in Latin or Cyrillic layout in a random volume from a specified range of length values.
- Option to connect each paragraph of gibberish text to its own masking active external link (to maximally confuse mailers in masking the true link).
- Generation of additional pages with gibberish text and/or vector drawings – graphic primitives, each of which has its own masking junk link.
- A library of just under 900 pre-selected graphic primitives for use on additional masking pages. The library can be modified and supplemented independently, further increasing the uniqueness of the generated PDFs.
- Generation of six fields in the META tags of PDF files (from the corresponding separate files). Can be used both for uniqueness and for “white” work with these parameters and their subsequent use for their intended purpose (see below). Two modes of operation – generation based on data from files (the result is a kind of meaningfulness 🙂 and randomly from Latin characters (for 4 meta tags, the remaining two must be generated from real parameters for authenticity).
- Improved meta tag generation algorithm (with data from files) – significantly greater uniqueness and a semblance of meaning 🙂
Examples:
metadata_title: Committee understand maintain training confront muslim
metadata_author: Ballard Campbell
metadata_keywords: president young minute
metadata_subject: Supporter enemy understanding imagination - Added generation of empty meta tags with a specified probability (100% – will always be empty, 0% – will never be empty)
- Added generation of meta tags from random Latin characters (only meta tags: title, author, subject, keywords).
Examples:
metadata_title: Liecunvojys kcrbwah hixg bd
metadata_author: Ccnwgaunwm Jyyqjmuixwhb
metadata_keywords: zub fquzorqysfwm ofctf anxygujzrxv dpxitgms
metadata_subject: Cchm zcplzbjo ergkrhylpsz qsow qacxtjhgaomg hih ftbcbwvvqlcheap murder competitive fashion fresh initial advocate - Now, multiple files can be used to generate gibberish text (instead of just one, as was previously the case) by placing them in the “pdf_res/bredotext” directory.
- The ability to pseudo-randomize external links in PDFs by adding various endings to them has been added. For example, anchor constructions of the form “#asgf423s”. Endings can be specified as a template with support for a number of macros (date, time, random numbers, and arbitrarily generated strings). There are 9 options to choose from for this feature.
- Two options for encrypting PDF content using the AES algorithm with a 128-bit key: full encryption (a password is required to open the file, and the contents of such a PDF file are completely inaccessible to email system anti-spam analyzers), partial content encryption (prohibits content extraction and file modification; anti-spam systems must spend some processing time decoding the file in order to access the content for analysis) .
It is possible to set both a user password and generate a random password with these passwords recorded in a file matching the PDF name.
This option is another parameter to test in search of improving the inbox 🙂
For a more detailed understanding of the PDF format and encryption in it, read my article here. - Removal of metadata (EXIF, comments) from uploaded images has been implemented. This will make each PDF file more unique in relation to other PDFs created with the same generator settings.
Attention! For images from the “pictures_user_set” catalog processed by a third-party HTML parser, metadata is not removed. Therefore, you need to manually remove metadata from these images before using them by embedding them in HTML code. - The “ANTI-BOT” tab of the program interface features a new set of tools designed to hinder the operation of email system filters. These include:
- Adding very small vector graphic primitives with active external masking links to random locations on the page.
- Converting all elements of the first page into a raster image makes it impossible to directly extract text from the PDF and analyze it with mail system filters. Analysis will only be possible after optical character recognition (OCR) with conversion to text for subsequent analysis.
- Adding special graphic elements with transparency on top of the resulting raster image of the first page to hinder the work of text recognition (OCR) algorithms from raster images.
- Option to apply several graphic filters to the resulting raster image of the first page (blurring, smoothing, edge detection, extrusion).
- Added image distortion mode for page 1 (geometric + noise overlay and additional blurring) also to counteract OCR systems (optical character recognition) systems.
- Experimental option. Mode for applying a semi-transparent image to the top of the first page.
- Experimental option. Mode for adding a camouflage element 0 at the beginning of the file. In theory, this should cause some pdf file parsers to crash, as the element does not comply with standards.
- Experimental option. Mode for adding camouflage 1 closer to the end of the file. In theory, this should cause some pdf file parsers to crash, as the element does not comply with standards.
Convenience, automation, and integration into workflows:
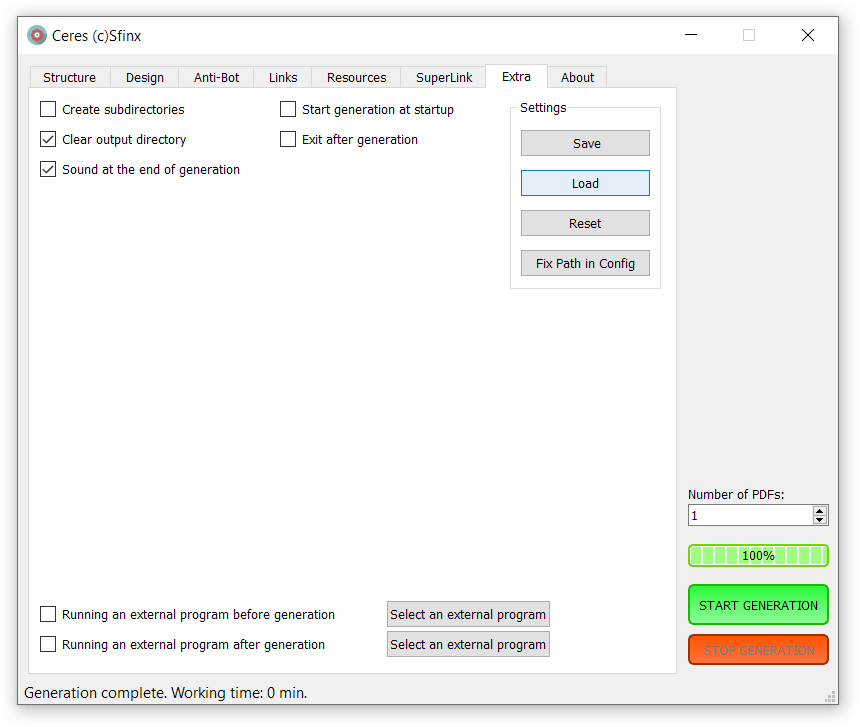
- Added support for configuration files: saving, recording, and resetting to default settings. When the generator starts, the configuration is automatically loaded; when it exits, the configuration is automatically saved.
- Added the ability to correct paths to resource files in the configuration file – previously specified paths are replaced with the correct standard paths for the current location of the generator. This option is necessary when moving the folder with the generator to another location or when using a configuration file from another copy of the generator.
- Added support for the configuration file specified in the launch line. Example of launching with the configuration file “config.ini”: Ceres_v1_40_prot_eng.exe –config=config.ini
- Added option to automatically exit the program after generation is complete.
- Added option to automatically start PDF generation after launching the program in the current configuration.
- Added option to delete existing files in the output directory when starting generation.
- Added option to run an external program after pressing START before PDF generation – only BAT files (*.bat) are run, and the generator WAITS for it to finish before starting PDF generation.
- Added option to run an external program after PDF generation is complete.
- Added “Stop generation” button to interrupt the generation process.
- Improved file selection dialogs: added display of the currently selected file when opening the dialog. Rewritten the logic of directory selection dialogs: now the current directory is shown when opening the dialog.
- Option to enable/disable an audible signal upon completion of PDF generation.
Why is Ceres a must-have right now?
It’s no secret that a new era has dawned in the world of email marketing, in which sending hundreds of thousands of emails with a good inbox is a thing of the past. It is becoming increasingly difficult to obtain high-quality consumables for mailings. It is becoming increasingly difficult to get through spam filters. It is becoming more and more expensive to get a lead. It’s time to change your approach to mailings from shooting sparrows with a cannon to precision shooting with a sniper rifle with significantly higher monetization (several times, or even dozens of times higher). To do this, you simply need to pre-clean the received database of invalid and junk addresses. And then extract the active, clicking recipients from it. Next, segment these active recipients by interest (verticals). Then, each mailing to the database will generate an excellent financial response for you and put you in a great mood. This is what you should strive for now.
Ceres allows you to select active recipients from the database and segment them according to certain criteria without having to work with segmenting landing pages, hosting, and VPS.
Sending a PDF attachment removes the link from the body of the email, which is the main focus of attention for email spam filters.
The Ceres generator can further mask your link within the PDF file among many other links. It is also capable of reducing the flow of bots to your TDS.
Also, using Ceres-generated PDFs for email attachments allows email providers to verify the safety of the PDF — that there are no loggers, stylers, or other malware in the file. Since the structure of PDF files is open to scanning and analysis by built-in antivirus programs in email clients (enabling content encryption can complicate these procedures, but unfortunately does not make them impossible).
Ceres can also help hide spam trigger words by breaking them down into parts to make them harder for mail servers to analyze.
It supports working with configuration files, auto-start generation when the program is launched, and exiting the program after generation is complete. All this allows you to integrate Ceres into your continuously operating mailing system.
At the time of release, the Ceres generator is unique in terms of its capabilities and the types of PDF files it generates. Its price point and protection will allow it to remain uncommon and unique for some time. And the owners of the generator will be able to turn these features into money, provided they use their heads and stay in touch with reality 🙂
System requirements
Ceres was compiled on Windows 10, 64-bit OS. It also ran on: Win 11, Windows Server 2016, 2019, 2022. Including on VPS/VDS. It has not been tested on other versions and bit depths of Windows. Other than that, there are no special requirements.
Algorithm for creating PDF files
When generation starts, the parameters specified in the interface are read. Then, data is read from all the files involved.
If the “SuperLink” mode is enabled, the file with email addresses and additional data fields is read. If the stop word filtering mode is also enabled, all emails containing entries from the stop word file are deleted from the database before PDF generation. In “SuperLink” mode, the parameter for specifying the number of files to generate does not work, and the number of resulting files depends only on the number of final emails in the database remaining after filtering. If there was no filtering, the original address database remains unchanged. Next, all emails in the database are converted to lowercase.
If filtering by stop words was performed, the addresses removed from the original database with stop word matches are written to a file with the following name: “original database name + -deleted.txt extension.” The cleaned database is written to a file with the following name: ‘name of the original database + the extension -clean_result.txt’.

In this screenshot, number 1 indicates the source database, number 2 indicates the cleaned database for subsequent PDF file generation, and number 3 indicates the addresses removed from the source database after filtering.
A CSV file with data for AMS Enterprise is created in the output directory (default ‘pdf_out’) with the following name: ‘name of the source database + extension -clean_result_AMS.csv’. Or this file is created in a dynamically created subdirectory if the “Create subdirectories” option is enabled at the top of the “Extra” settings tab. This file specifies line by line which email from the database corresponds to which generated PDF. Example line: caroline-hoffner@gmail.com,11.pdf That’s it for the “SuperLink” mode.
Next, the process of generating PDF files begins. The required number of files is generated sequentially. For each file created, the program generates its composition, structure, size, text, images, meta tags, creation date and time, and output file name based on the settings.
The creation of each PDF file begins with the creation of the first page.
How the front page is made:
- The type (structure) of the first page is determined.
- If necessary, gibberish text is generated at the beginning of the first page. Gibberish text is taken from a file or generated from a selected set of characters (Latin or Russian). It is intended for additional randomization of the PDF file and to confuse the neural network analyzers of email providers when evaluating incoming emails.
- Next, the main content of the first page is created (depending on the selected option). This can be just an image (or a QR code in its place), just text, an image and text in various visual combinations, or a random selection from these sets.
- Then, if necessary, gibberish text is generated at the end of the first page.
ATTENTION! The page creation algorithm sequentially creates and places the specified elements on the page field. The algorithm does not attempt to fit all the specified elements onto the page by reducing their size, with the sole purpose of making everything fit. Therefore, a situation may arise where all the elements simply do not fit on one page and will be transferred to a newly created page. And the concluding gibberish text can often be among the elements that did not fit. For example, after a large amount of main text that did not fit completely or was written in large font. The optimal parameters will have to be selected manually and the result will have to be checked.
Then, the specified number of blank pages is inserted (if they are required).
Next, the required number of additional pages of the selected type is generated.
If the encryption option is enabled, the file contents are securely encrypted. Then the file is written to the output directory (or dynamically generated subdirectory) with a name formed according to the “Output PDF file name” option (located at the bottom of the second tab with the “Appearance” parameters).
INFO! When “SuperLink” mode is enabled, all meaningful links in the PDF (not junk or masked links) are appended with a suffix containing the part specified by the user in the “Prefix for email in the resulting link” field + the recipient’s email address. This option can be disabled. It is also possible to encode emails in Base16, Base32, and Base64 formats. The resulting links will look like this: http://link.com?q=email@mail.com
Description of program settings
ATTENTION! When you start generating PDF files (by clicking the green “START GENERATION” button), the program saves the current settings. Changing the settings while the program is running does not affect the PDF generation process that has already started.
At the bottom right of the software interface, you will find: a window for setting the number of PDF files to generate, a generation progress indicator (this changes for each file, so when running in SuperLink mode with a large database, it may not change for several minutes), a “Start generation” button to start the generation process, and a “Stop generation” button to interrupt the generation.

The “Structure” tab
The settings on this tab are responsible for the visual structure and page layout of the future PDF file.

“Layout of elements on the first page”
Possible options:
- 00. Image without text
- 01. Text without image
- 02. Image on the left, text on the right
- 03. Image on the right, text on the left
- 04. Image on top (auto-size), text below
- 05. Image below (auto-size), text on top
- 06. Random option from 0.1
- 07. Random option from 2.3
- 08. Random option from 4.5
- 09. Random option from 2.3.4.5
- 10. Random option from 0.1.2.3.4.5
- 11. Image at the top (50% width), text at the bottom
- 12. Image at the top (30% width), text at the bottom
- 13. Image at the top (20% width), text at the bottom
- 14. Picture at the bottom (50% width), text at the top
- 15. Picture at the bottom (30% width), text at the top
- 16. Picture at the bottom (20% width), text at the top
- 17. Random option from 11,12,13
- 18. Random option from 14, 15, 16
- 19. Random option from 11, 14
- 20. Random option from 12, 15
- 21. Random option from 13, 16
I will demonstrate what the main layout options look like:


“Links on the first page”
Possible options:
- 0. One link for the entire page area.
- 1. Link to the image LINK, links in the text – anchors.
- 2. No active links except for links in the text.
Option 0 allows you to place the main link from the “main_links.txt” file across the entire page, i.e., no matter where the recipient clicks on the page, they will be redirected to the link. If the page contains gibberish text with junk links (for a description of junk links, see the section on gibberish text parameters), it will be covered by your link.
Option 1: the main link from the “main_links.txt” file is placed on the main image of the first page, links in the text are written separately – explicitly using the HTML tag <a href=”&link&” > (see the description of the input text format) – which will allow you to hide the transition address itself from the recipient, or directly – by specifying the URL of the link. You can also use substitutions from built-in macros and file macros (specified by the user). Option 1 allows you to additionally place masking “junk links” of gibberish text on the first page, which will make it ambiguous for the mailer to determine the final transition address 🙂 You can also describe various user behavior scenarios in the text and create a separate link for each situation. For example, you can conduct a text survey based on interests or other criteria to segment the database. A total of 6 such links (anchors) can be defined, in addition to the main link.
Option 2 does not automatically place links on images or the entire page area. It is still possible to explicitly write links in the text, as in option 1. This option is for creating a PDF in which you need to get a user response that is different from clicking on a link. For example, calling a specified phone number, sending an SMS to a specified number, or scanning a QR code.
“Take the main links LINK from the file”
Possible options:
- 0. In order
- 1. Randomly
Links are not deleted after collection. If the links in the file end while being sorted through in order, the transition to the beginning of the list of links occurs.
Option “PIC -> QR on 1st page”
When this option is enabled, the first page image is replaced with a QR code generated from the main LINK reference. All layout options work the same as for images.

Next comes a block with gibberish parameters.
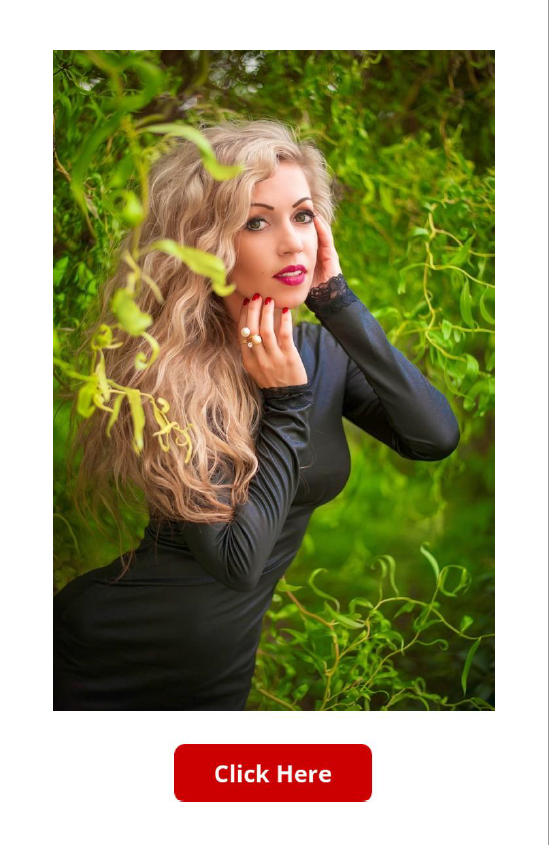
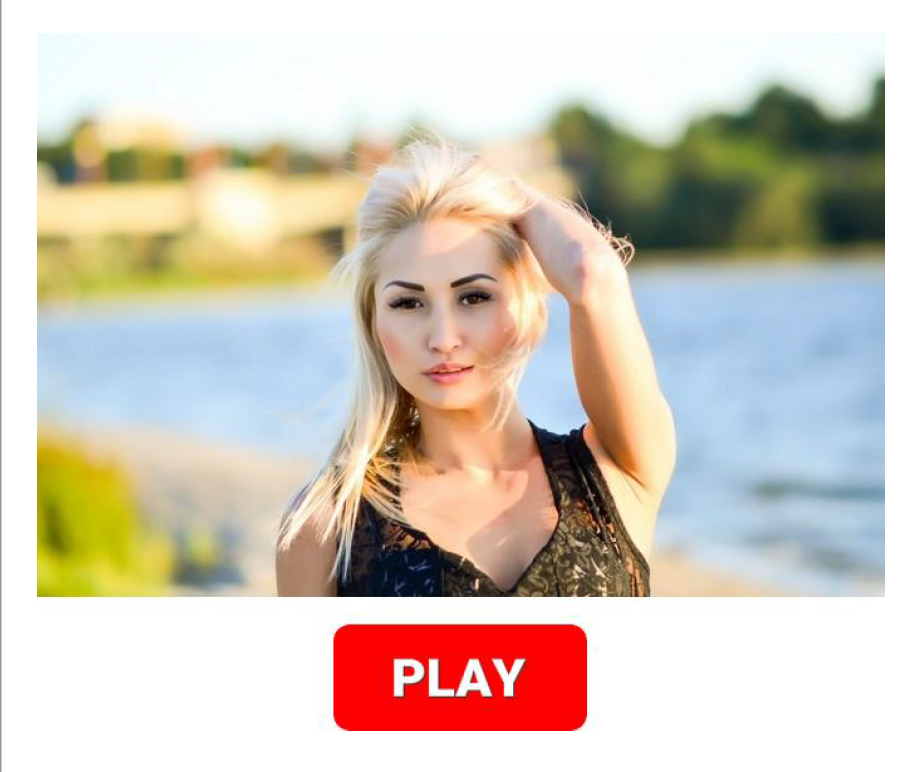
Option “Add CTA button after main image”
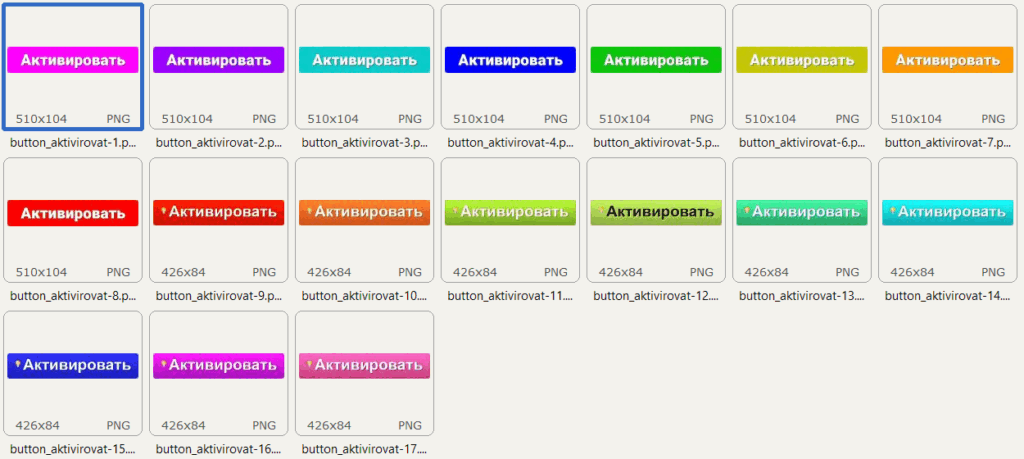
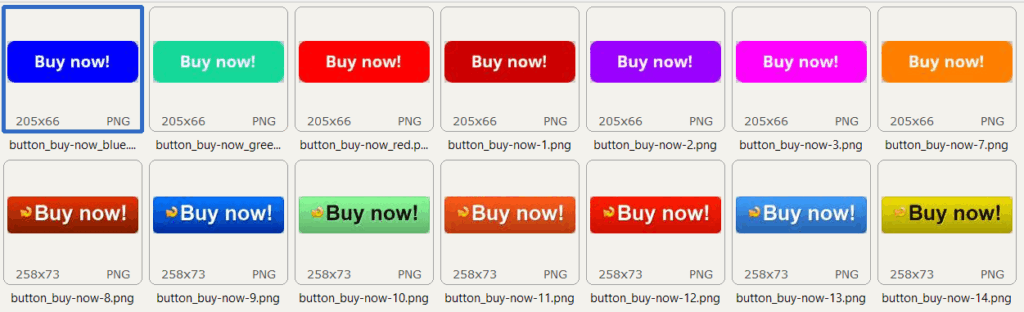
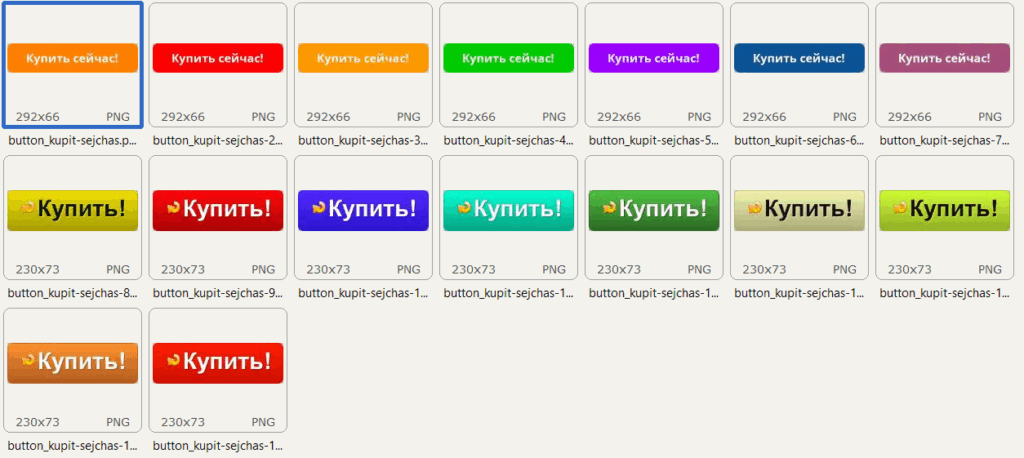
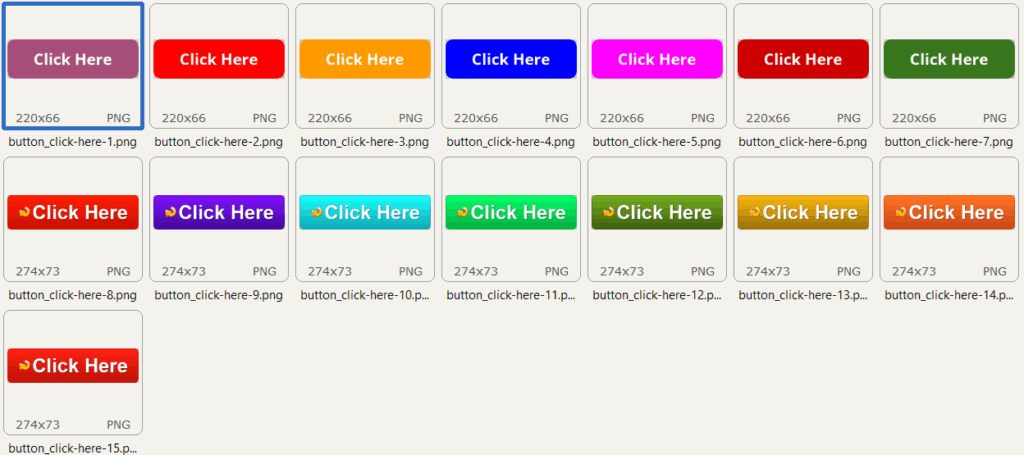
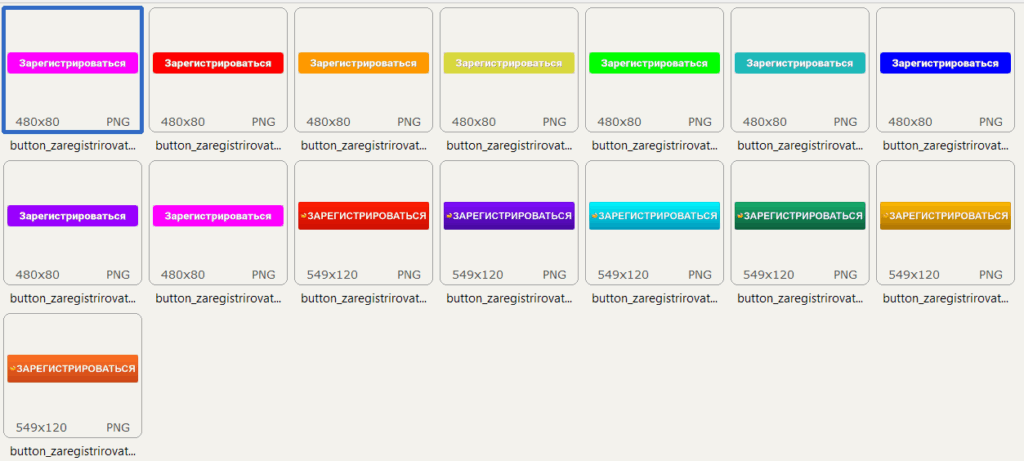
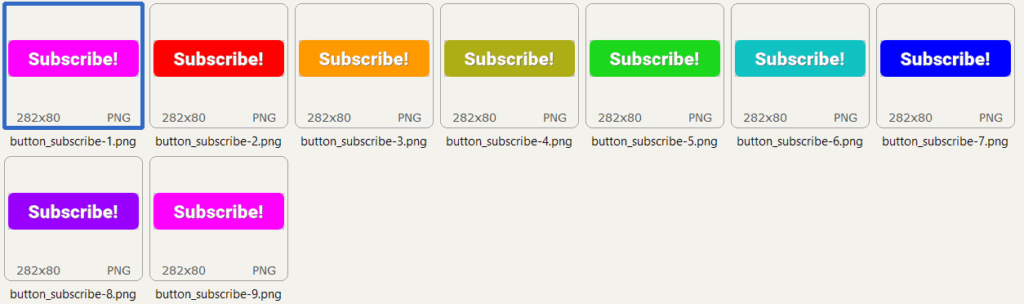
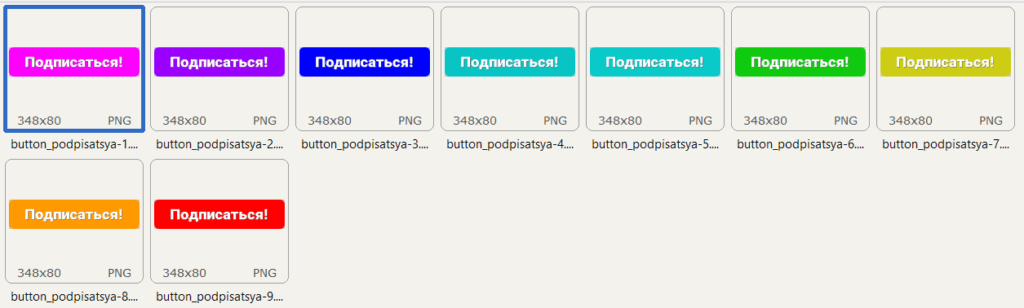
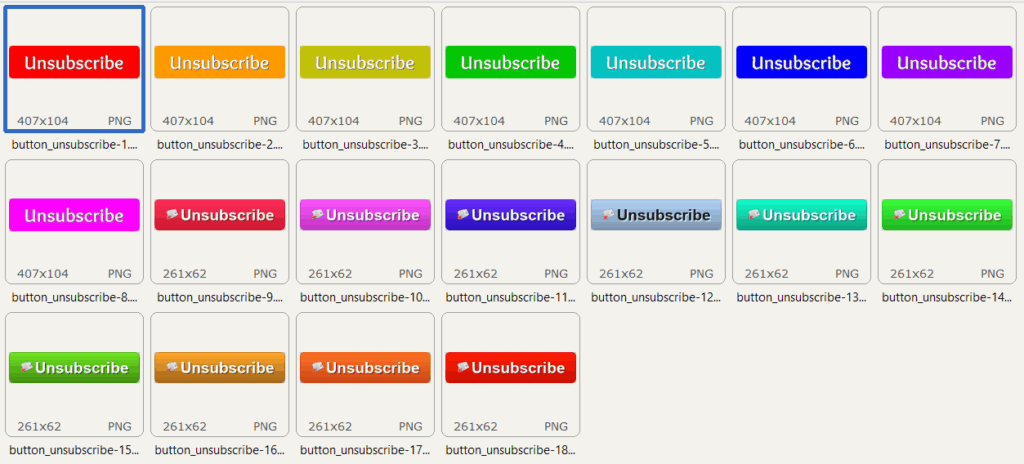
Enabling this option activates the procedure of combining the main image from the “/pdf_res/pictures/” directory with an additional image from the “/pdf_res/pictures_action/” directory. This option is needed to automatically add call-to-action buttons (CTA Buttons) to the main image. Such as: Activate, Buy, Click here, Download, Learn more, Play, Register, Subscribe, Unsubscribe, Watch. Buttons can be added at the bottom or superimposed on the first image. See examples below.
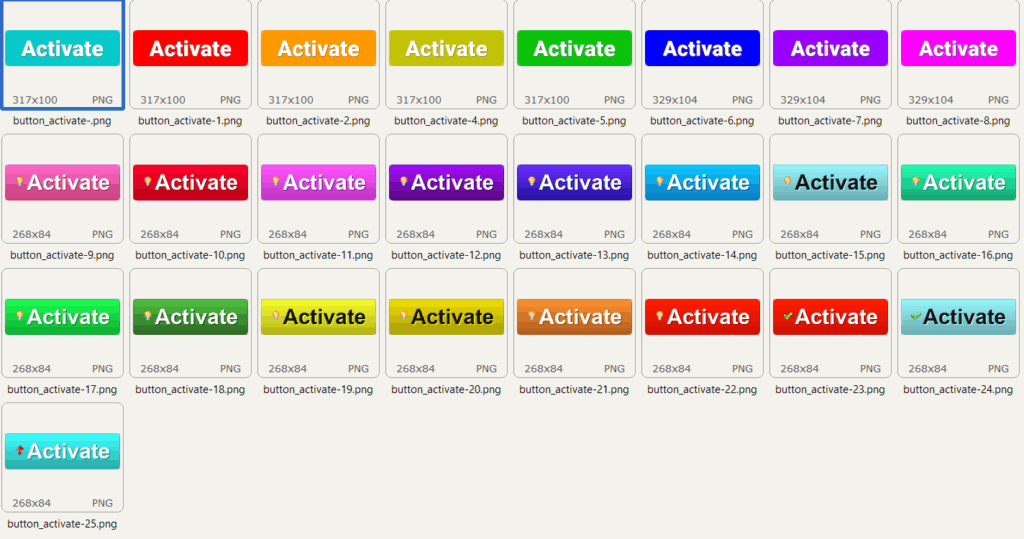
The generator comes with a set of 317 ready-made CTA buttons. The buttons are available in two languages: English and Russian. They are placed in subdirectories according to their theme. There are 10 thematic sets in total, which have already been listed above. You can use your own images to add to/under the main image. Transparency in PNG files is supported when overlaying the first image.
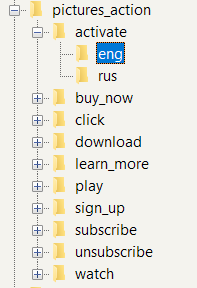
The current catalog with button images is selected on the “Resources” tab after calling the “Select Catalog with CTA Buttons” dialog.
Option parameters:
Margin – The value of the indent from the main (top) image before placing the bottom image. It is set as a percentage of the height of the main image. The default value is 5%. With negative values, the second image is superimposed on the first. For example, with an indent value of -50%, the second image will be superimposed on the first image, starting from the middle of the first image. With an indent value of -100%, the second image will be superimposed on the first image, starting from the top edge (beginning) of the first image.
Width – The width value of the added bottom image (button). It is specified as a percentage of the width of the main image (top). The default value is 25%.
Here are some examples of how this option works:


317 ready-made CTA buttons included in the generator package

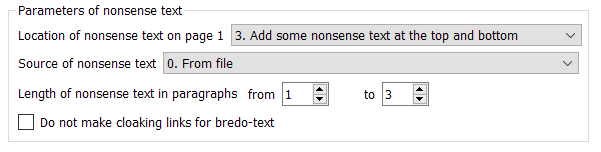
“Location of nonsense text on page 1”
Possible options:
- 0. Do not add gibberish text.
- 1. Add gibberish text at the bottom of the page.
- 2. Add gibberish text at the top of the page.
- 3. Add gibberish text at the top and bottom of the page.
- 4. Random option from 0, 1, 2.
- 5. Random option from 1, 2
- 6. Random option from 0, 1, 2, 3
- 7. Random option from 1, 2, 3
“Source of nonsense text”
Possible options:
- 0. From file
- 1. Generation from Latin alphabet
- 2. Generation from Russian alphabet
- 3. Random option from 0, 1, 2
- 4. Random option from 1, 2
- 5. Random option from 0, 1
- 6. Random option from 0, 2
Length of nonsense text in paragraphs
Paragraph – text before a line break. Sets the range in paragraphs from minimum to maximum, in which the volume of gibberish insertions at the beginning and end of the first page will change, if present. Paragraph – one or more sentences ending with a line break character.
Checkbox “Do not make cloaking links for bredo-text”
Do not create active external cloaking links for gibberish text (nonsense text), leaving only one gibberish text. The option works for gibberish text throughout the entire document.
Next is a block with parameters for other pages – “Generation of additional pages” and a block of additional parameters for generating PDF file meta tags.

Insert blank pages after the first page, from and to
For values greater than zero, blank pages are inserted after the first page, in the range from to (for each PDF, a random value from this range is generated). This option is independent of any other options. Blank pages may exist regardless of whether additional pages are generated after them or not.
“Type of content generated”
Defines the type of additional pages to be created. These pages follow blank pages, if any, or immediately after the first page if blank page generation is disabled. Possible options:
- 00. Do not generate additional pages.
- 01. Generation from graphic primitives.
- 02. Generation from 1 photo per page.
- 03. Generation from 2 photos per page.
- 04. Generation from 4 photos per page.
- 05. Generation from gibberish text.
- 06. Generation from gibberish text and graphics
- 07. Random option from 0, 1
- 08. Random option from 0, 1, 2
- 09. Random option from 1, 2
- 10. Random option from 2, 3, 4
- 11. Random option from 1, 2, 3, 4
- 12. Random option from 0, 1, 2, 3, 4
- 13. Random option from 0, 5
- 14. Random option from 1, 5
- 15. Random option from 1, 5, 6
- 16. Random option from 2, 5
- 17. Random option from 1, 2, 3, 4, 5, 6
Next, let’s take a closer look at the basic options listed above..
“00. Do not generate additional pages” – no additional pages will be generated in the current file.
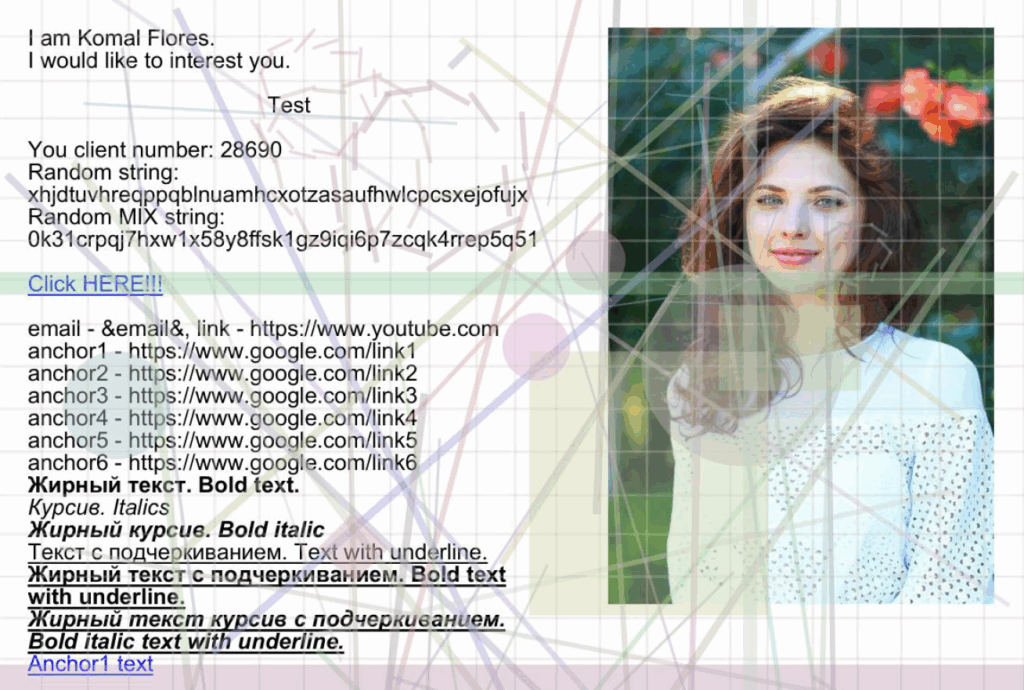
“01. Generation from graphic primitives” – the page will be formed from randomly selected graphic primitive icons (see example – screenshot of such a page below). The primitives are located in the “svg” subdirectory of the “pdf_res” resource directory. They are vector SVG files. There are about 900 different primitives in total. You can add new SVG files to this subdirectory yourself. Please note that some of the SVG files may generate an error and will not be placed during generation. The program will not crash with an error, it will simply not render the erroneous SVG file. Therefore, when adding new SVG files, it is recommended to place them one by one in the “svg” subdirectory and test each one for suitability. If the rendering was successful in the resulting PDF, move the verified SVG file to another location and continue. Then move all verified files back to the “svg” subdirectory and start working. This way, the amount of graphics used is very large, which only enhances the individuality of each generated file.

“02. Generation from the first photo on the page” – one image is placed on the page. It is taken randomly from the subdirectory “/pdf_res/ pictures_dop1”. A link is placed on the image, taken randomly from the file “anchor_link1.txt”.

“03. Generation from 2 photos on a page” – two images are placed on the page (see example on the right). They are taken randomly from the subdirectories “/pdf_res/ pictures_dop1” (top) and “/pdf_res/ pictures_dop2” (bottom). A link is placed on the upper image, taken randomly from the file “anchor_link1.txt”. A link is placed on the lower image, taken randomly from the file “anchor_link2.txt”.

“04. Generation from 4 photos on a page” – four images are placed on the page in a 2×2 pattern (see example below) sequentially from left to right and top to bottom. The images are taken randomly from the subdirectories “/pdf_res/ pictures_dop1” – position Picture-1, “/pdf_res/ pictures_dop2” – position Picture-2, “/pdf_res/ pictures_dop3” – position Picture-3, and “/pdf_res/ pictures_dop4” – position Picture-4. Links are taken randomly from the files “anchor_link1.txt” – position Picture-1, “anchor_link2.txt” – position Picture-2, “anchor_link3.txt” – position Picture-3, and “anchor_link4.txt” – position Picture-4.

“05. Generation from nonsense text” — a certain number of paragraphs of masking text are generated on the page. The parameters are taken from the “Nonsense text parameters” block of the “PDF structure” tab. Namely, the source of nonsense text (file, generation of Latin characters, generation of Russian characters), the length of one block of nonsense text in paragraphs. In the example below, 5 such blocks of nonsense text are generated. Each gibberish text block has its own masking link, which is taken randomly from the “bredotext_links.txt” file. This means that each text block is clickable and leads to a specific address on the Internet.

“06. Generation from nonsense text and graphics” In this variant, nonsense text is first generated on the page according to point 05, then primitives are drawn on top according to point 01. A separate external masking link is attached to each paragraph of text and each graphic primitive. See the screenshot below for an example.

Options 07–17 are various combinations of the content generation options already listed on additional pages. You can use one option, several options, or various combinations. This way, you can get a bunch of structural and content combos that’ll make it really hard for email marketers’ neural networks to analyze and won’t let them clearly link your mailings to PDF files. And it’ll let white hat marketers run different segmentation and validation scenarios.
Number of generated pages
Here, we set the range between the minimum and maximum values from which the number of additionally generated PDF pages is randomly selected.
Checkbox«Junk links»
When this option is enabled (enabled by default — check mark present), for each graphic primitive created on additional pages in options 01, 06, and their inclusion in mixed variants, an active masking link is created, which is taken arbitrarily from the file “bredotext_links.txt”, similar to links in blocks of gibberish text. This option is also designed to complicate the analysis of the PDF file’s content in terms of active external links by masking your main link among distracting “junk” links. This option completes the group of additional page parameters.
«MetaTags» group
The “Generation” checkbox enables the generation of meta tags from random characters. Data from the corresponding files is not used. Only the following meta tag fields are generated: title, author, subject, keywords. The producer and creator meta tags are still taken from the files (these are important for the authenticity of PDF meta tags, which should not be generated randomly).
The “Empty with probability of” checkbox — when this option is enabled, the meta tag fields: title, author, subject, and keywords will be made empty with the probability (in percent) specified below. If the value is 100%, the meta tag field will be empty.
When the options in this group are disabled, meta tags will be created based on data from the corresponding files (for more details, see the section describing input files).
Examples of meta tag generation (since version 1.20, the algorithm has been improved, resulting in significantly greater uniqueness and a certain degree of meaningfulness):
metadata_title: Committee understands maintaining training confronts Muslims
metadata_author: Ballard Campbell
metadata_keywords: President Young minute
metadata_subject: Supporter enemy understanding imagination
“Date and time of PDF creation”
Option to select the algorithm for determining the creation date of a PDF file. Possible options:
- 0. Substitute current values
- 1. Generate random values
- 2. Random selection from 0, 1
I think everything is clear here. According to point 1, the range of generated dates is from minus 5 years from the current point to the current point in time.
INFO! The document creation date is one of two PDF file parameters. The creation date is an internal parameter of the PDF document. You can view the creation date, as well as other important parameters, including meta tags, in Acrobat Reader Pro by pressing “CTRL-D.” It will be located in the “Created” field. The creation date of the physical file, which you can see in Explorer (or another file manager) and which is the date the file was physically saved to disk, will be set accordingly.

PDF content encryption options

Possible options:
- 0. Do not encrypt PDF
- 1. Content protection
- 2. Full encryption
When options 1 and 2 are enabled, the PDF file is encrypted using the AES algorithm with a 128-bit key.
When mode “1. Content protection” is selected, any editing, modification of the file, or extraction of text and graphics from it is prohibited. However, viewing (including in a browser on the email provider’s website) remains available. The content itself is encoded and cannot be analyzed directly when viewing the file. Prior decoding is required, which is what the email provider’s anti-spam system does when analyzing our PDF file. This operation requires additional processing time, but is always performed to analyze the security of the content and generate a preview image for display in the browser when viewing the email. Thus, such PDF encryption complicates its analysis by email providers, but does not make it impossible.
When “2. Full encryption” mode is selected, the PDF file is fully encrypted, after which a password must be entered before any operation can be performed on the file. In this case, neither previewing in a browser nor analysis by anti-spam systems of email services is possible in principle, since access to the content requires a decryption operation, for which a password key must be entered.
In previous versions of the generator, I did not perform full encryption because it was impossible for the recipient to open such a file without a password, and transferring the password to the recipient is not straightforward. In this version, I have implemented the ability to use both a user-specified password (it will be the same for the entire set of generated PDF files) and a randomly generated password.
The user password is entered in the next window to the right of the encryption type selection. If the field remains empty, the password generated by the program is used.
Next is the option to write the names of PDF files and passwords for opening them to a text file line by line. The line format is “file_name,password”. A file named “pdf_password.txt” is created in the same folder where the generated PDFs are saved. An example of such a file:1.pdf,9z1zyngkh
2.pdf,2pvlqva
3.pdf,ezrlvs
4.pdf,iqqxmkqeg
5.pdf,j6cty4uhv
6.pdf,70v9fv0b8p
7.pdf,uwopyc2
8.pdf,cbsmd4o94
9.pdf,jh88zwmd
10.pdf,z1742bevah
11.pdf,n4d0eb
12.pdf,ns1lqfas4
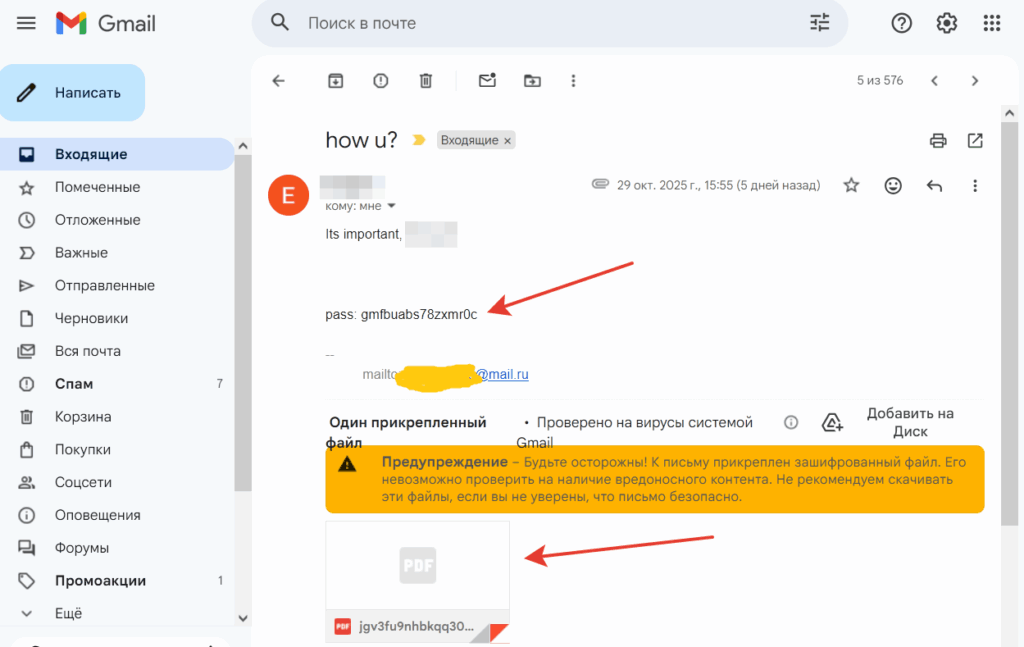
When sending emails, you can include the password for opening the attached PDF file in the body of the email. If it is a static password set by the user, this is very easy to do, but the uniqueness of the emails will suffer, as the password will be the same and will be a constant in a series of emails. If it is a dynamic password, you will have to somehow implement the insertion of an individual password into the email, taken from the “pdf_password.txt” correspondence file based on the name used. If you have your own mailing software, this will not be a problem 🙂
Below is a screenshot from the Gmail interface – a view of an email with an encrypted PDF and a password to open it in the body of the email:
The “Appearance” tab — “Design”
This tab contains settings that affect the appearance of the PDF file being created.
Attention! Some of the lower parameters on the tab are hidden — to make them visible, scroll the slider to the right of the parameters (marked with a red arrow in the screenshot below).
“PDF size – page width, height, and delta”
Specify the width and height of the page in millimeters. The Delta parameter determines the range within which the width and height of each generated file will vary as a percentage of the specified values. If the delta is zero, all generated files will have the same dimensions and will be equal to the specified values.
Example: for a document size of 210×297 mm (A4 standard) and Delta=10%, the range of possible widths will be from 210-210*0.1=189 mm to 210+210*0.1=231 mm; in height from 297-297*0.1=267 mm to 297+297*0.1=326 mm.
Margins (internal indents from the sheet borders) of the first page
Indents from the edges of the first sheet inward before placing content. Specified in millimeters. Needed to fit the generated text content to the background. For simulating business documents, letterheads, etc.
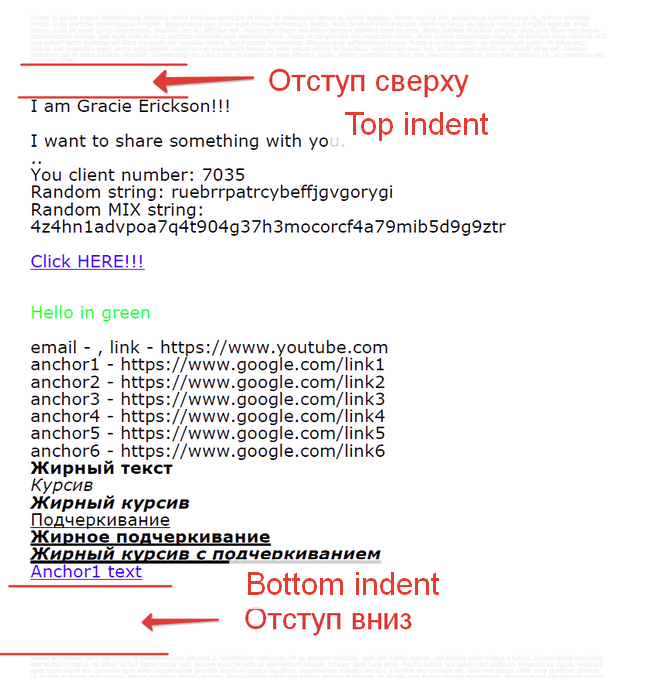
Indent from top of the top nonsense text to the content (in mm)
Sets the range of values in millimeters for creating vertical indentation from the top margin of the page and the top boilerplate text (if any) to the useful content (images or text) on the first page. Set in millimeters.
Indent down from useful content (in mm) on the 1st page
Sets the range of values in millimeters for creating vertical spacing between the bottom edge of the image or useful text (the lowest object is taken) and the first paragraph of gibberish text when it is generated at the bottom of the page (after the useful content). Set in millimeters.
Text color
Set the colors for the first page text (main text), the first page gibberish, and the additional page gibberish separately. When you enable the “Vary within” checkboxes for each file, the color will vary within the percentages specified below (10% by default) of the selected RGB color values. The change is similar to the Delta parameter in sizes. By default, the main text is set to black RGB (0,0,0), the first page gibberish is set to gray RGB (240,240,240), and the additional page gibberish is set to gray RGB (225,225,225).
Font size of the main text (pt) from
A range of values from minimum to maximum for randomly generating the font size of the main text on the first page within these limits. Specified in standard points.
Please note! When setting page dimensions, font sizes are not reduced proportionally to the page dimensions to ensure all content fits on the page. Therefore, if the page size is small and the font size is large, even the text alone may not fit on the page.
Nonsense text font Size (pt)
The minimum to maximum range of values for randomly generating the font size of nonsense text on all pages of the document within these limits. Specified in standard points.
Graphics for the background of the 1st page
Enables placement of a background image on the first page from a graphic file randomly selected in the “picture_background_1page” directory. Supported raster formats are JPG, PNG, and vector format SVG. The image is adjusted to fit the page size of the generated PDF. Therefore, to avoid significant distortion, make the page size the same proportion as the image. That is, if the image has an aspect ratio of 1:2 (1000×2000 pixels), then the page size can be 150×300mm, 100×200mm, or 200×400mm.
Graphics for the background of add. pages
Enables placement on all subsequent pages (after the first and blank pages) of a background image from a graphic file randomly selected from the “picture_background_npage” directory. Supported raster formats are JPG, PNG, and the vector format SVG. The image is adjusted to the page size of the generated PDF. Therefore, to avoid significant distortion, make the page size with the same aspect ratio as the image. That is, if the image has an aspect ratio of 1:2 (1000×2000 pixels), then the page size can be made 150×300mm, 100×200mm, or 200×400mm.
Selecting a font for PDF generation:
Selects the font to be used for rendering PDF text. The font is consistent within a single PDF and is explicitly specified in steps 0-7. The remaining options randomly select from the specified options for each subsequent PDF generation. Possible options:
- 00. Arial
- 01. Times New Roman
- 02. Verdana
- 03. Courier New monospace
- 04. Calibri
- 05. Segoe UI
- 06. Candara
- 07. Comic Sans MS
- 08. Random from 0, 1
- 09. Random from 0, 1, 2, 3
- 10. Random from 0, 2, 4
- 11. Random from 1, 5, 6
- 12. Random from 4, 5, 6
- 13. Random from 4, 5, 6, 7
- 14. Random from 0, 1, 2, 3, 4, 5, 6
- 15. Random from 0-7 (all)
Within a single document (PDF file), one selected font is used. This font may be explicitly specified in steps 0-7 or randomly selected from them.
Next come the options for setting up filters for image processing
Images placed on the first page and images placed on additional pages are processed separately. Applying filters makes each image unique in terms of its byte-by-byte content, but not unique when deeply analyzed by neural networks that capture the image’s meaning. However, email providers are unlikely to have the resources for such in-depth analysis for each email, so we can assume that filter processing makes each image unique. This is especially true if the filter is applied multiple times (this is also configurable). In other words, the Ceres PDF generator has a built-in graphics uniqueness analyzer, which adds points to the overall uniqueness of the resulting PDFs.
Processing images of the 1st page:
Выбор графического фильтра для обработки растровых изображений на первой странице. Опция предназначена для уникализации изображений с точки зрения их цифрового содержимого.
Возможные варианты применения графических фильтров на изображении:
- 00. Do not add filters
- 01. BLUR Filter
- 02. SHARPEN Filter
- 03. DETAIL Filter
- 04. SMOOTH Filter
- 05. NOISE Filter
- 06. MIRROR Filter
- 07. Random selection from options 0-6
- 08. Random selection from options 1-6
- 09. Random selection from options 1-5
- 10. Random selection from options 0-5
- 11. For images with text. Random selection from 0, 2, 3
- 12. For images with text. Random selection from 2, 3
Processing images of add. pages:
Same as the previous set of options. However, they apply to images on all subsequent pages of the document after the first.
How many times do we apply the selected filter on one picture, from
The number of times a filter, either explicitly or randomly, is applied to a single raster image. Selecting a mirror filter and selecting a multiple of two will not visually change the image. However, the effect of other filters will be enhanced. Experiment with the limits. However, remember that using graphic filters significantly consumes computer resources and slows down document generation.
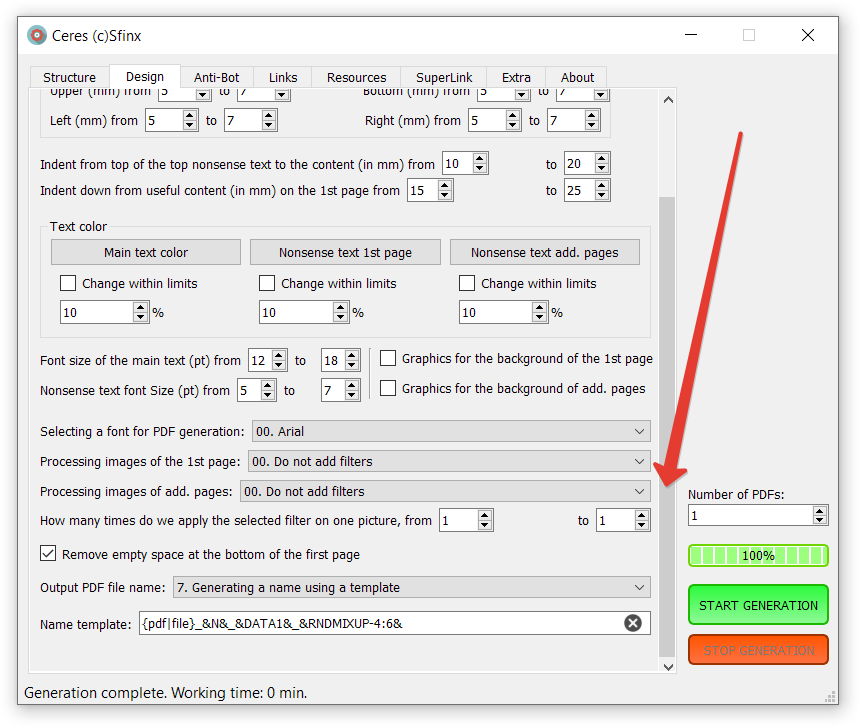
Option «Remove empty space at the bottom of the first page»
Enables the removal of white space (unoccupied by text and images) at the bottom of the first page. These margins occur because the PDF page size is set first, and then the content is rendered on that page. It is therefore impossible to accurately determine the required page size at the outset. This is done to ensure a larger visual display of the PDF when displaying the attachment thumbnail (preview) and when subsequently viewed in browsers. If the content specified in the template does not fit on one (the first) page, cropping occurs on the last page. Cropping is not performed on additional pages. This option is unique to PDF generators due to the specifics of the PDF creation process.
An example of using this option can be seen in the screenshot below.

Output PDF file name
Select the name generation mode for the created PDF file. Does not work in SuperLink mode. Possible options:
- 0. Sequence number
- 1. Sequence number and add random
- 2. Take the name from the file and add a serial number
- 3. Generate randomly
- 4. Random selection from items 0, 1
- 5. Random selection from items 0, 1, 2
- 6. Random selection from items 0, 1, 2, 3
- 7. Generating a name using a template
When generating a name using a template, spins like {option-1|option-2|option-3} are supported. The following macros are also supported:
&N&– Replace with the serial number of the generated PDF&DATA1&– Replace with the current date in the “Year-Month-Day” format&DATA2&– Replace with the current date in the “Day-Month-Year” format&MBIG&– Replace with the current month in the long “December” format&MSHORT&– Replace with the current month in the short “Dec” format&DAY&– Replace with the current day (a number from 01 to 31)&TIME1&– Replace with the current time in the “Hours-Minutes-Seconds” format&TIME2&– Replace with the current time in the “Hours-Minutes” format&EMAIL&– Replace with email in SuperLink mode&RNDNUM-A:B&– Insert a random number from A to B, where A < B and integers.&RNDSTR-A:B&– inserts a random string of Latin characters (a-z, lowercase) with a length equal to a random number from A to B, where A is less than B and the characters are integers.&RNDSTRUP-A:B&– inserts a random string of Latin characters (a-z, UPPERCASE) with a length equal to a random number from A to B, where A is less than B and the characters are integers.&RNDMIX-A:B&– inserts a random string of Latin characters and digits (a-z lowercase, 0-9 digits) with a length equal to a random number from A to B, where A is less than B and the characters are integers.&RNDMIXUP-A:B&– insert a random string of Latin alphabet characters and numbers (a-z CAPITAL, 0-9 digits) with a length equal to a random number from the range from A to B. Where A is less than B and these are integers.
Example: &RNDNUM-500:1000&. The result is a random number between 500 and 1000.
«Anti-Bot» tab
This tab provides tools to make it more difficult for email system filters to recognize the subject matter of your content in a PDF file.
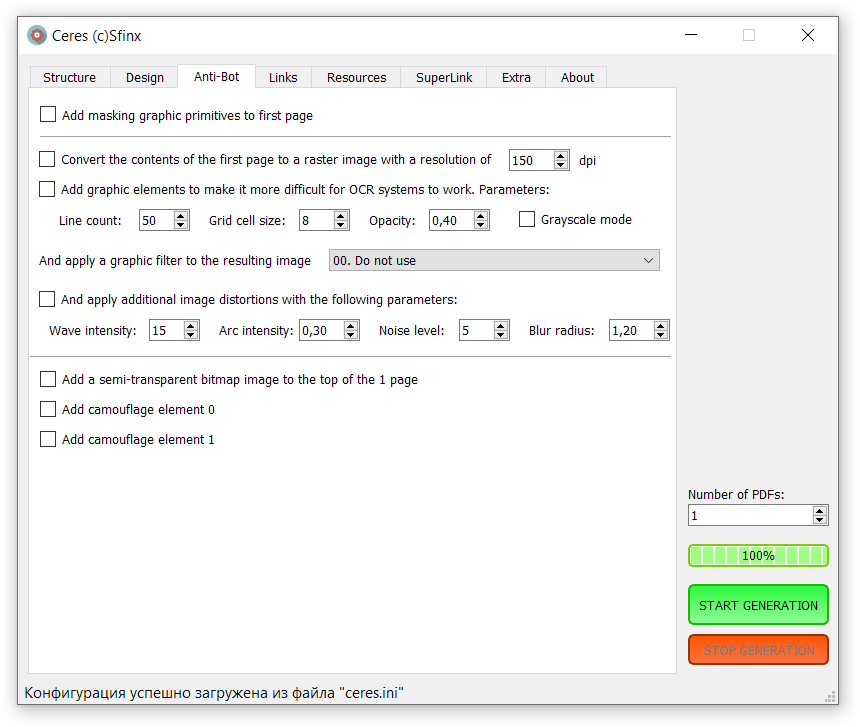
Option «Add masking graphic primitives to first page»
The option to create small masking graphic primitives with active links on the first page. This option is used to mask your main working link. This option can be combined with the option below to convert the first page to a raster image: in this case, two sets of primitives will be created: the first set will be converted to the resulting image, and the second set will be overlaid as a vector and contain active links.
If the content (image + text + nonsense text, if any) does not fit on the first page, a second page is created, containing the elements that did not fit on the first page. In this case, masking primitives are also placed on the second page. However, if the option to crop the bottom free space is enabled, the masking primitives on the second page may be cropped.
Important! To enable additional links from cloaking primitives, select option 1 in the “Links on the first page” menu – “Link to image LINK, links in text – anchors.” If option 0 is selected, the resulting main link will override all cloaking primitives.
A group of options for converting the contents of one page into an image and introducing distortions into it
These options are designed to hinder the analysis of your file by neural network spam filters in email services. Enabling these options increases computer resource consumption when generating a PDF file and results in a slowdown in PDF generation. Here’s an example to help you understand the extent of the slowdown:
- Generation time without image conversion and distortion: 0.44 minutes
- Generation time with image conversion and all possible distortions: 2.32 minutes
Option «Convert the contents of the first page to a raster image with a resolution of 150 dpi»
Enables conversion of the entire contents of the first page of a PDF to a raster image at the specified resolution (default: 150 dpi). The lower the resolution, the less legible small elements are, the more difficult it is for email filters to recognize text from such images, and the smaller the resulting image size. This option is intended to make it more difficult for email filters to detect the content of your message: if the PDF file contains no direct text, email system filters will only be able to perform OCR on images, which is resource-intensive and not widely used.
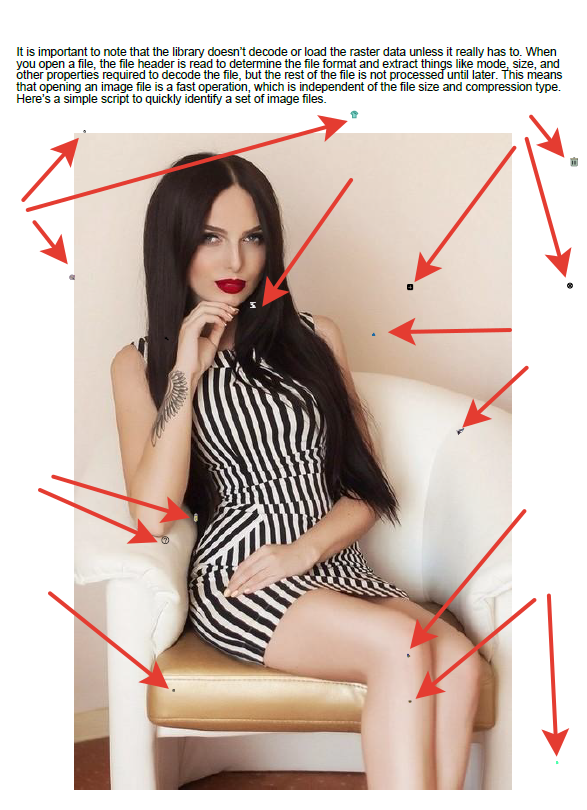
Option «Add graphic elements to make it more difficult for OCR systems to work. Parameters:»
Enables the addition of special transparent graphic elements at the top of the first page to hinder text recognition algorithms for raster images (OCR). The parameters are specified below:
- Line count – the number of superimposed lines
- Grid cell size – cell size of the overlay grid
- Opacity – Transparency of elements. A value of 1 means opaque elements, while 0.1 means almost completely transparent elements.
- Grayscale mode – A checkbox to enable grayscale conversion for these elements. By default, colored elements are overlaid.
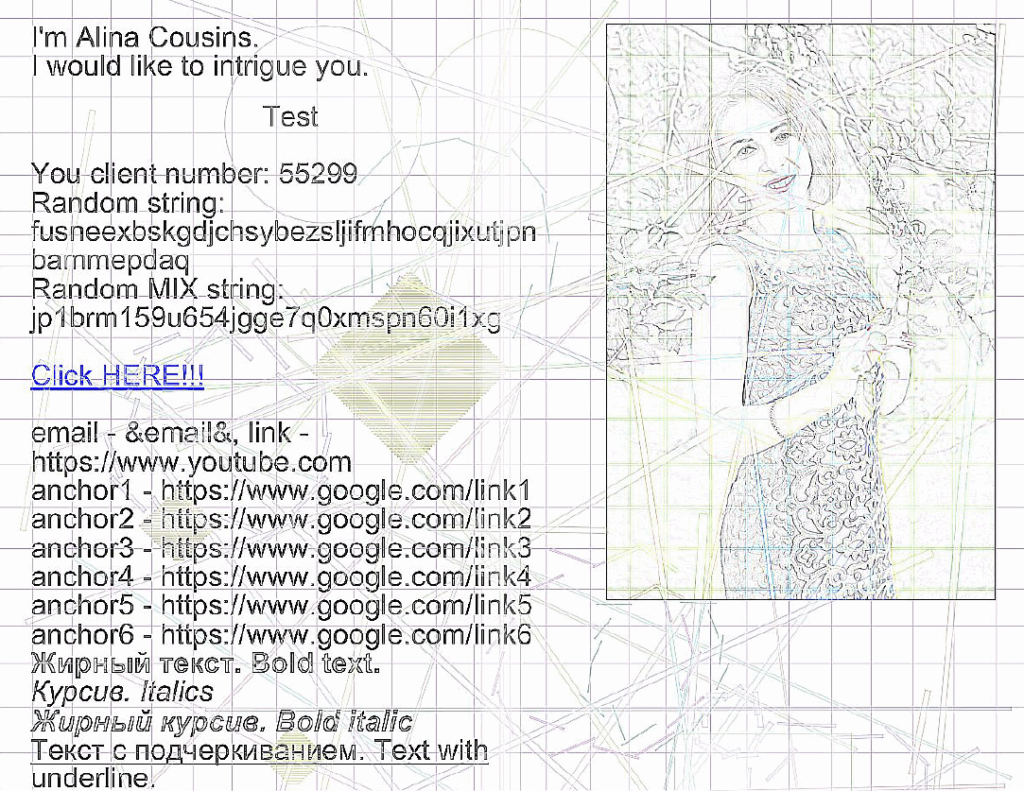
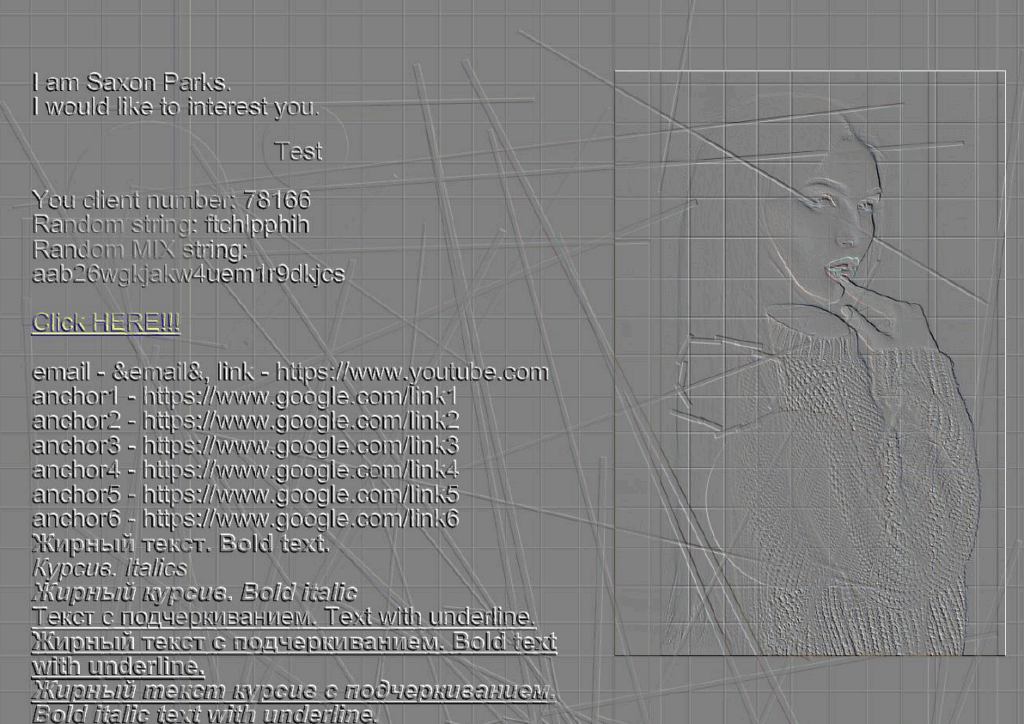
Option «And apply a graphic filter to the resulting image»
This involves applying additional graphic filters to the raster image received so far. These filters further enhance the image’s uniqueness and hinder the work of text recognition (OCR) algorithms and the semantic context of email systems’ neural network filters, rendering them completely ineffective.
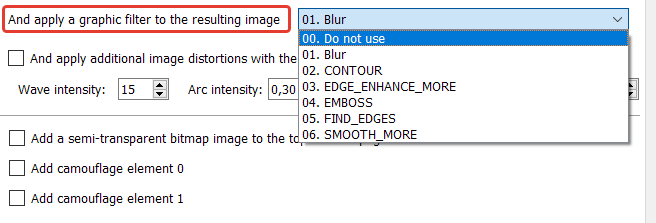
Additional graphic filters available:
- Blur. Used to blur an image generally and evenly. Essentially, BLUR creates a subtle blur or soft-focus effect. It’s the go-to tool when you want to soften an image slightly without losing too much important edge information.
- CONTOUR. Transforms the image into a line drawing, similar to a sketch. As a result, all colors and textures disappear, and the image becomes black and white (more precisely, grayscale). Only the outlines remain. The filter retains only the outlines, creating the effect of a pencil drawing. Imagine taking tracing paper, placing it over a photograph, and tracing all the visible edges. The CONTOUR filter does something very similar. It’s often used to create artistic effects or for tasks where only the shapes of objects are important, not their inner content.
- EDGE_ENHANCE_MORE. Designed to sharpen the edges of an image. It works by finding the boundaries between areas of different colors or brightness (i.e., the edges of objects) and making them more contrasting and noticeable. Simply put, this filter makes an image “sharper” and “sharper,” emphasizing details.
- EMBOSS. Creates the effect of an image being embossed onto a surface, such as metal or paper. The result is a stylized image in which details appear three-dimensional and embossed.
- FIND_EDGES. Converts an image into a black-and-white outline drawing. It works very similarly to the CONTOUR filter, but with one key difference in the result. Finds Edges – the filter analyzes the image and finds all sharp changes in color and brightness, i.e., the edges of objects. Creates a “negative” outline – unlike CONTOUR, which draws dark lines on a light background, FIND_EDGES does the opposite – it draws light (white) lines on a dark (black) background. The resulting image resembles a chalk drawing on a blackboard or the negative of a sketch. This filter is excellent for highlighting the structure of objects in an image, completely removing color and texture information.
- SMOOTH_MORE. The SMOOTH_MORE filter (stronger anti-aliasing) is designed to blur and soften an image.
Comparison of SMOOTH_MORE and BLUR:
BLUR is a subtle blur that softens the image slightly.
SMOOTH_MORE is a powerful, aggressive blur that significantly averages out the colors and creates a very soft image.
If you need a subtle softening effect, use BLUR. If you want a strong watercolor or foggy effect, choose SMOOTH_MORE.
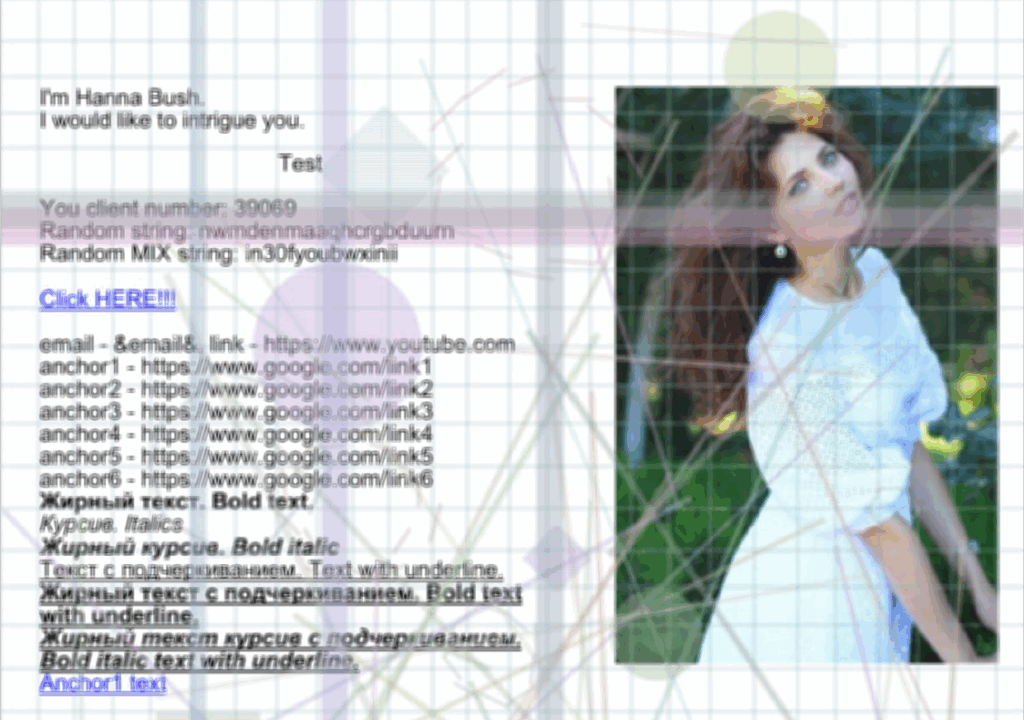
Option «And apply additional image distortions with the following parameters:»
Next, you can apply the geometric distortion option to the resulting image, adding noise and additional blur to the resulting image.

The following options are available:
- Wave intensity – The intensity of the wave-type image distortion. The default value is 15.
- Arc intensity – Another parameter for distortion intensity. The default value is 0.30.
- Noise level – The intensity of color noise applied to the image. The default value is 5.
- Blur radius – The intensity of the final resulting image blur. The default value is 1.20.
By changing the settings, you can increase or decrease geometric distortions, making the work of text recognition algorithms (OCR), algorithms for identifying objects in photos, and algorithms for obtaining the overall contextual meaning of an image increasingly difficult, to the point of making it impossible to work correctly.
Below, as an example, I’ll show the results of an optical character recognition system (the service is located here, and you can upload your own PDF files and experiment) using the following files:
- 1 – A raster PDF file without distortions. File name “1_original.pdf” – this and subsequent files can be downloaded and viewed in the generator’s Telegram channel.
- 2 – A raster PDF file with default distortion parameters configured. File name “1deform.pdf.pdf”.
- 3 – A raster PDF file with distortion parameters increased relative to the default values. File name “1_deform_more.pdf”.
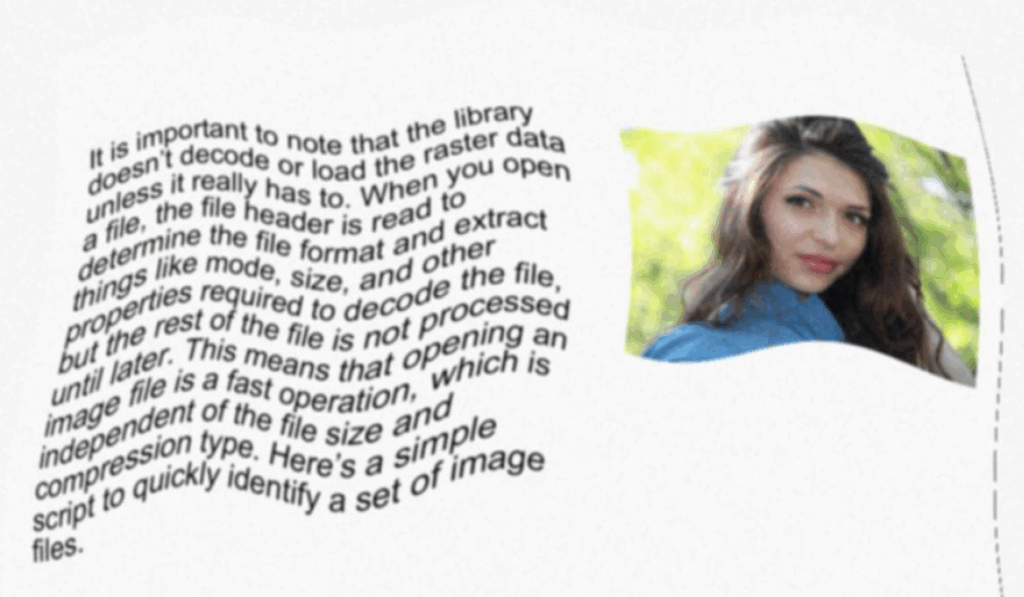
1 – raster PDF file without distortion. File name “1_original.pdf”
The result of the text recognition algorithms (OCR):
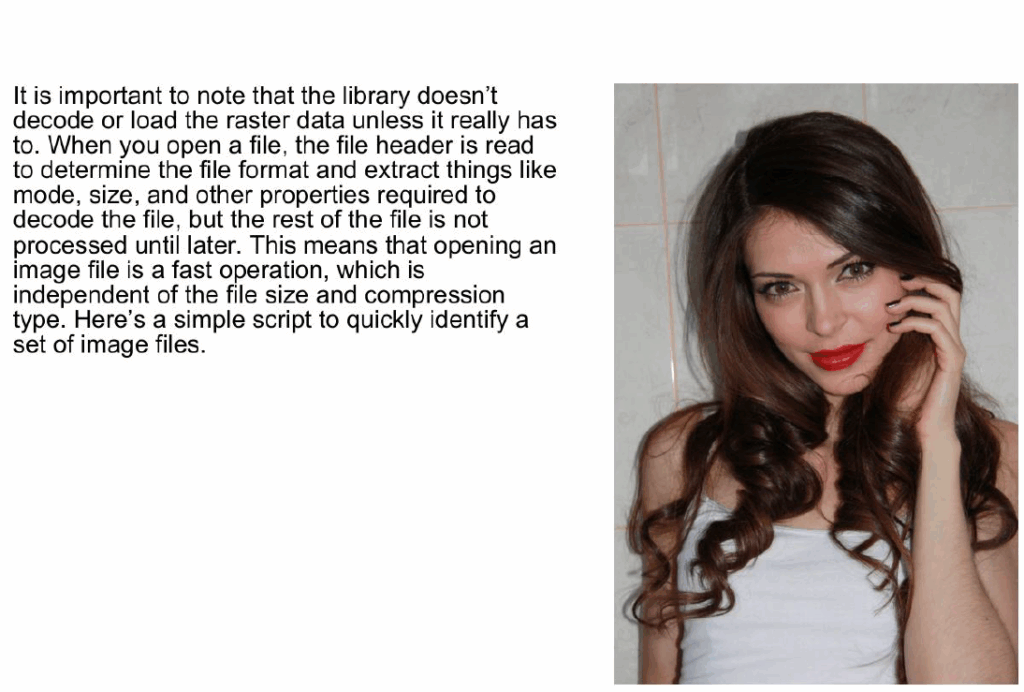
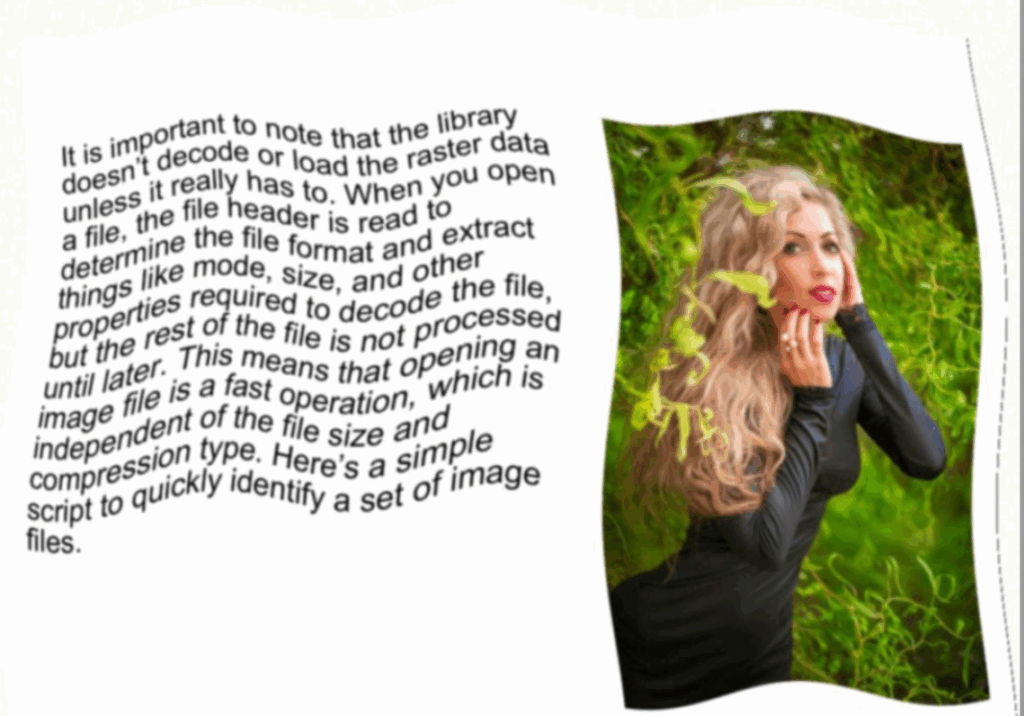
It is important to note that the library doesn’t decode or load the raster data unless it really has to. When you open a file, the file header is read to determine the file format and extract things like mode, size, and other properties required to decode the file, but the rest of the file is not processed until later.
This means that opening an image file is a fast operation, which is independent of the file size and compression type. Here’s a simple script to quickly identify a set of image files.
As you can see, the text was 100% recognized. Therefore, the email system’s neural network filter can easily understand what you’re talking about and mark your email as spam for the recipient, or even delete it altogether if it detects a violation of the service’s terms in the subject line.
2 – a raster PDF file with default distortion settings configured
Distortion parameters: Wave intensity: 15, Arc intensity: 0.3, Noise level: 5, Blur radius: 1.2
The result of the text recognition algorithms:
It is ir?°rtacti;tjto ncite that ttle libraArY de st ehor __ ,a ter uata doesrill ItJaci the 1 unless illel a file, the the Pa header has to. when you open deterrrine like nleodelle, format extract thing,smes r quiredsize’ arid other misarteaanddt° the file, propr filetoisdencootde rest of the proc.essed but The This mp, until Weer hi is a fasioans that oPerling an Peratiorl, image if vypich is indep nt of th encii, tvn the file size any compressivr i. ii type. Here’s a sirriPie script to quici( files. Y sdentifY a set Of irnag
As you can see, the selected OCR service couldn’t handle the default image distortion settings, and the resulting character set was incomprehensible to the neural network algorithms of email system filters. Consequently, it’s impossible to mark the message as spam or delete it—what if it’s IMPORTANT to the recipient?
But! If you’re sending from a source (server, account) with a reputation already tainted by spam filters, no matter how you disguise the content, the filters will mark any new email with this protection as spam simply because it’s from a source they don’t trust (one that’s sent spam before).
3- raster PDF file with distortion parameters increased in relation to the default values
Distortion parameters: Wave intensity: 21, Arc intensity: 0.6, Noise level: 25, Blur radius: 1.3
The result of the text recognition algorithms:
rtani n t ecod: note that “leg librraW a Os illiPcd 1 doe5 it reai ”’ Or load trle rwste data 01655 tY has vvnerldfil °Pen LI file, the flie he to. 0 grime the acier is read 1- t ,frote hie (… „nd ex ract Fi_tsiliiiekse rmegoduiersrzrmeiaatrizocia i oettfore file, a re.51.of ihe7;it_o,den_‘ nroc.esseci PLIA.1vigoter Thisrnel_1:: is u_L.5.1erli.ng is an_c” 4 file is a fast al S that 471.;;PICh IS irneir octant of th °Peration. ci dePe ion ty e tile s-ze ail in fess Pe. H i owie corriP.- Quickly id ere’s a 51 image ,i to en:if_ t of i ge scrip ‘Y a se files.
In this case, the OCR system’s output is even more chaotic. Consequently, it will be even more difficult for the neural network algorithms of email system filters to understand the content of your email.
Experimental options
Below are experimental options, the results of which may or may not be apparent. Their effectiveness should be tested under specific conditions. Filter responses from different email systems may vary, just as the systems themselves may differ. Unfortunately, the algorithms for PDF parsers in email service anti-spam systems are not publicly known. Therefore, it is unknown how, or if, these experimental options will affect the filters of these anti-spam systems.
Consider these options as additional parameters in the fight for inbox space, but try to test them yourself first under your specific conditions. Determine whether enabling these options (all or just some of them) yields any positive results. It is advisable to contact the generator’s author with the results of your tests, describing the PDF generation parameters, the mailing parameters, and the results. Perhaps, through joint efforts, we can make progress in this direction.
Option «Add a semi-transparent bitmap image to the top of the 1 page»
Add a layer with a semi-transparent raster image to the top of the first page.
Option «Add camouflage element 0»
Add a masking element 0 to the first page at the beginning. This will make it more difficult for email parsers to recognize the context of the first page’s content. In theory, this should cause problems for PDF parsers due to intentional errors in the element’s description. However, how this will affect subsequent analysis by email systems is unknown.
Option «Add camouflage element 1»
Add a masking element 1 to the end of the first page. This will make it more difficult for email parsers to recognize the context of the first page’s content. In theory, this should cause problems for PDF parsers due to intentional errors in the element’s description. However, how this will affect subsequent analysis by email systems is unknown.
The “Links” tab
This tab provides additional link transformation operations for links used in the generated PDF file.

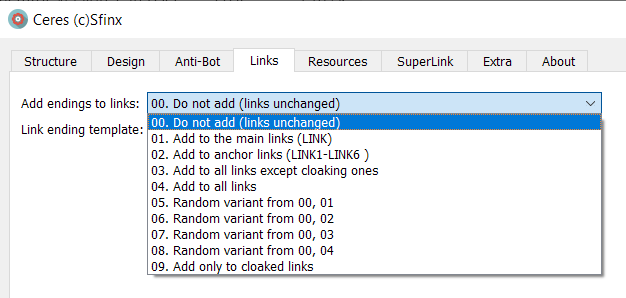
Option “Add endings to links:”
Possible options:
- 00. Do not add (links unchanged)
- 01. Add to main links LINK
- 02. Add to anchor links LINK1-LINK6
- 03. Add to all links except cloaking links
- 04. Add to all links
- 05. Random from 00, 01
- 06. Random from 00, 02
- 07. Random from 00, 03
- 08. Random from 00, 04
- 09. Add to cloaking links only
This option adds anchor tags of the specified template type to the selected link types. These tags do not change the original link’s destination. They modify the link, making it unique in terms of how it’s written (since each tag is randomly generated), but not in terms of the destination. This isn’t a replacement for full-fledged redirects; it’s just another way to add complexity to the email client when parsing PDFs.
Input field “Link ending template:”
Default value: “/#&RNDMIX-8:20&”.
Allows you to specify the type of anchor suffix added to PDF links for additional uniqueness.
Supported spintags are {option-1|option-2|option-3}.
Macro support:&N& – Replace with the serial number of the generated PDF&DATA1& – Replace with the current date in the “Year-Month-Day” format&DATA2& – Replace with the current date in the “Day-Month-Year” format&MBIG& – Replace with the current month in the long “December” format&MSHORT& – Replace with the current month in the short “Dec” format&DAY& – Replace with the current day (a number from 01 to 31)&TIME1& – Replace with the current time in the “Hours-Minutes-Seconds” format&TIME2& – Replace with the current time in the “Hours-Minutes” format&EMAIL& – Replace with email in SuperLink mode&RNDNUM-A:B& – Insert a random number from A to B, where A < B and integers.&RNDSTR-A:B& – inserts a random string of Latin characters (a-z, lowercase) with a length equal to a random number from A to B, where A is less than B and the characters are integers.&RNDSTRUP-A:B& – inserts a random string of Latin characters (a-z, UPPERCASE) with a length equal to a random number from A to B, where A is less than B and the characters are integers.&RNDMIX-A:B& – inserts a random string of Latin characters and digits (a-z lowercase, 0-9 digits) with a length equal to a random number from A to B, where A is less than B and the characters are integers.&RNDMIXUP-A:B& – inserts a random string of Latin characters and digits (a-z in uppercase, 0-9 digits) with a length equal to a random number from A to B. Where A is less than B and both are integers.
Example: &RNDNUM-500:1000&. The result is a random number between 500 and 1000.
Warning! Do not use this option with links to redirect services and similar services—it will break the original link.
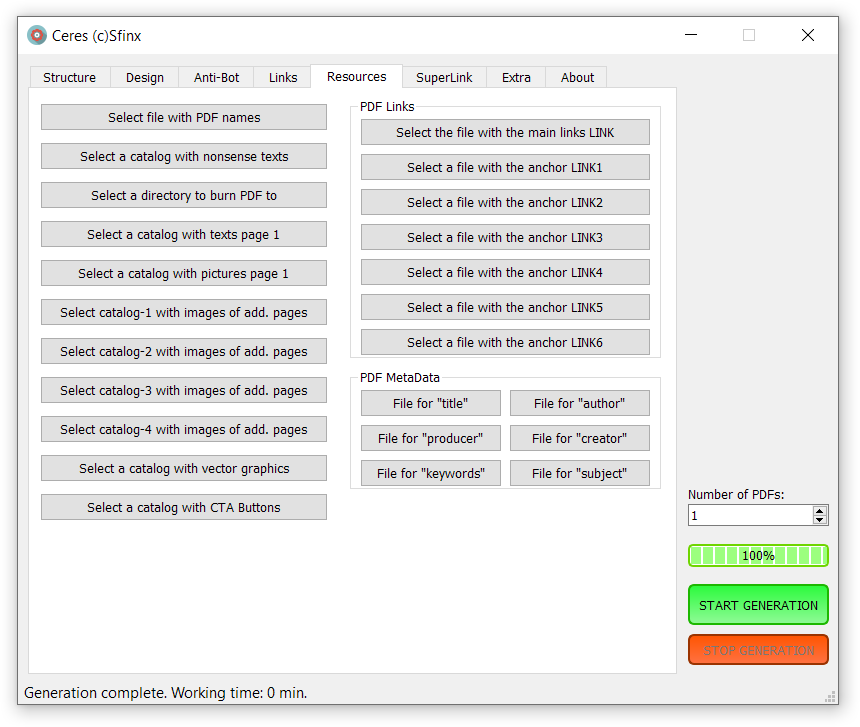
The Resources tab
On this tab, you can change the default input data files and the directory for saving the resulting PDFs. The program provides tooltips for each option and the default paths and files. Therefore, I won’t go into detail about these options here.
SuperLink tab
This is another feature that makes the Ceres generator unique and sets it apart from all other PDF generators for email newsletters.
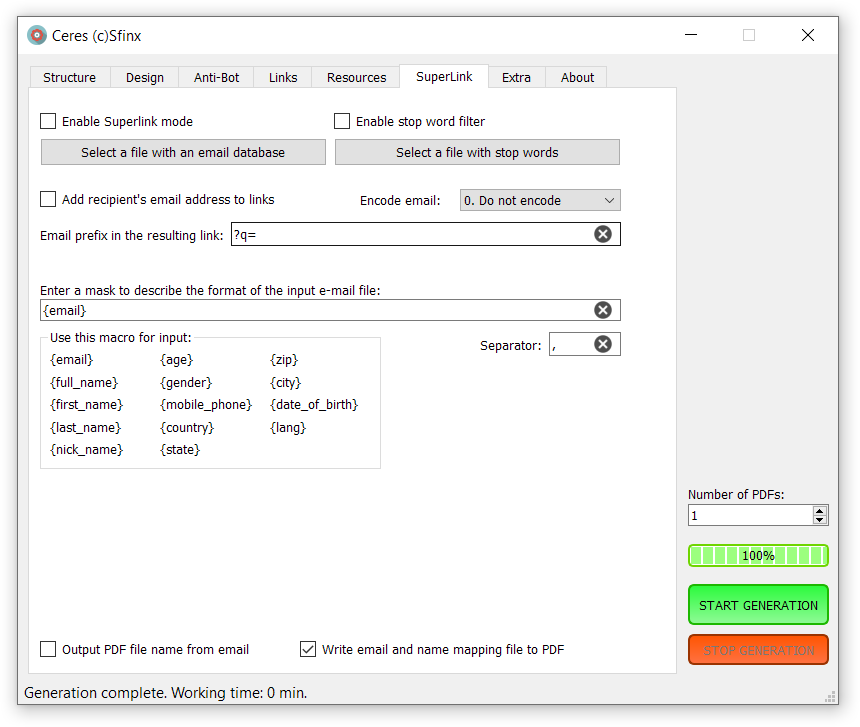
The “Enable Superlink Mode” checkbox enables email database support. In this mode, PDF files are created based on the number of emails uploaded: one email corresponds to one PDF. Each such PDF supports macros for inserting the recipient’s email address and additional data from up to 13 additional fields (if additional fields are available). Personalized links can also be embedded in these PDFs (by adding the recipient’s email address to all external links).
The “Select Email Database File” button opens a dialog box for selecting a file containing a line-by-line list of email addresses to be embedded in the document being created. By default, this is the file “pdf_res/email-base.txt.”
The “Enable stopword filter” checkbox enables filtering of data from the selected email file. This means that if a line from the file containing stop words is detected in an email string, that line will not be processed (it will be written to a separate file). For more information on the operation mode and the files written, see the “PDF Creation Algorithm” section at the beginning of this guide.
The “Select file with stop words” button opens a dialog box for selecting a file with a line-by-line list of stop words whose matches will be filtered and deleted. By default, the file is “pdf_res/email-stopwords.txt.”
In “Superlink” mode, the number of generated PDF files is determined by the emails remaining after filtering and is independent of the “How many to generate PDFs” parameter.
The “Add recipient’s email address to links” checkbox enables the option to append the recipient’s email address to all useful links. This is required by trackers (ZTDS, Keitaro, Google Analytics, Yandex.Metrica, etc.) to track clicks on links in our generated PDF files.
“Email prefix in resulting link” – specifies the text that will be added to links taken from files before the recipient’s email address is added. The default value for key processing in the ZTDS traffic distribution system is “?q=”. This results in links like this: http://link.com?q=email@mail.com. For more information on passing keywords to ZTDS, see HERE (passing keywords). You can specify a custom value – a UTM prefix or something else.
The “Encode email” parameter determines the recipient’s email address in the resulting link. Possible values:
- 0. Do not encode (email remains in clear, human-readable text)
- 1. Base16
- 2. Base32
- 3. Base64
Next comes a section describing the format of the imported email file. This must be a Windows text file (CR LF) in UTF-8 encoding (like all other input files). All data fields must be separated by a delimiter (comma, semicolon, colon, etc.) without spaces.
Right:
{email},{nick_name},{gender},{country}Wrong:
{email}, {nick_name}, {gender}, {country}
You need to create a description of the components of the imported rows, including email addresses and additional fields (their presence is possible, but not required). To do this, in the row (where the {email} macro currently appears), specify the additional database fields in the order they appear using the corresponding macros.
Example of a string for an imported database (in the generator example file):
Email-1@mail.com,Name-1 Surmame-1,+1(800)000-0001,male,state-1,city-1 An example of an import description for such a line:
{email}{full_name}{mobile_phone}{gender}{state}{city}If you only include the {email} email macro in the description, all other fields will be unavailable for creating PDF content. However, this option also works. You don’t need to manually enter a separator between inserted macros. Simply specify it in the “Separator:” field—a comma is sufficient in most cases.
To copy a macro name, hover over it and left-click three times. The macro will be selected. Then, press CTRL-C (copy the selection to the clipboard). Next, position the cursor in the desired location in the import format description line and press CTRL-V (paste from the clipboard). To quickly clear the input field, click the cross on the right side of this field.
All fields defined by macros will be available for further use in the PDF text via email macros. Their description is further described in the section on program macros. Macro naming is arbitrary. You can use the {age} macro to designate any additional field in the imported database.
The “Output PDF file name from email” checkbox enables naming of the resulting PDF files based on the email field in the imported email file. When this option is enabled, PDF files are named only as ‘.pdf’, where is the email address from the email database file. Example: for the email address “mail@gmail.com,” the output PDF file will be named “mail@gmail.com.pdf.” Enabling this option overrides the “Output PDF file name” option in the ‘Appearance’ tab.
The “Write email to PDF name mapping file” checkbox enables writing a file mapping the email address to the resulting PDF name in the output directory. The format of the line in this file is: email,file_name.pdf This is a simple text file named “-clean_result_AMS.csv.” This file is also duplicated with the “.txt” extension for convenience. This is necessary so that the program sending the emails (AMS, for example) knows which recipient to send each personalized PDF file to. Max Terentyev’s AMS Enterprise supports such attachments. For information on configuring AMS to work with this file, see the section “Using CERES with AMS Enterprise.”
ATTENTION! In SuperLink mode, after reading a file with an email address, the downloaded email addresses are validated. If an email address is invalid (contains invalid characters, does not contain the “@” symbol, or otherwise), it is excluded from the final email database for generation. This is why, when starting SuperLink mode, the number of files to generate window will be less than the total number of downloaded email addresses:

Extra tab
Here you will find service settings that are not directly related to PDF generation, but that make working with the generator more convenient and add powerful integration capabilities into your existing workflows of the CERES generator.
Create subdirectories
When this option is enabled, a new folder named after the current date and time will be automatically created in the directory for saving generated PDF files each time PDF generation starts. All PDF files generated during that run will be saved to this folder. By default, this option is disabled, and all generated PDFs are saved to the PDF saving subdirectory—by default, “pdf_out.” New PDFs will overwrite existing ones with the same name!
Clear output directory
When this option is enabled, all files (not folders, just files) in the output directory will be deleted after clicking the “Start” button. This option ensures that each generation run leaves only newly generated PDF files in the output directory, deleting everything that already existed. This, combined with periodic launching from the Windows scheduler, will allow you to regularly update PDF files for emails automatically, without your intervention.
Sound at the end of generation
When this option is enabled, a sound is played at the end of generation, signaling that the work is finished.
Running an external program before generation
When this option is enabled, pressing the “START GENERATION” button launches an external file. You can select it by clicking the “Select External Program” button on the right.
Only the BAT file (.bat) is launched, and the generator WAITS for it to complete before starting generation. After generation, you can launch any program (.bat or .exe).
By default, the “_start.bat” file, located in the generator’s root directory, will be launched. You can edit this file to create your own script—move files from one location to another, delete files, launch various programs, etc. What are BAT files? A BAT file is a sequence of commands for the command line interpreter, in the form of a text file with the .bat or .cmd extension. The main purpose of batch files is to automate routine computer user actions. A BAT batch file is a text document with a special extension. For more information, see here, for example.
Running an external program after generation
When this option is enabled, an external file is launched after PDF generation is complete. You can select it by clicking the “Select external program” button on the right. By default, the “_final.bat” file, located in the generator’s root directory, will be launched.
Start generation at startup
When enabled, CERES immediately begins generating PDFs after launch using the parameters specified during the previous launch. This option is used to launch the generator from an external application. For more details, see the section “Integrating Ceres into Workflows and Configuration Management“.
Exit after generation
This is a logical extension of the previous option. When enabled, the program will exit immediately after PDF generation is complete. If sound is enabled, it will exit immediately after the sound plays. This option is also useful for integrating the generator into workflows.
Settings group
Complements the program’s configuration. When the program starts, the configuration is automatically read from the configuration file named “ceres.ini” by default. When the program exits, the configuration is also automatically written to the configuration file named “ceres.ini” by default. For more information on working with configuration, see the section “Integrating Ceres into Workflows and Configuration Management“.
The ‘Save’ button saves the current generator settings to the configuration file. By default, this is “ceres.ini.”
The ‘Load’ button loads the generator settings from the configuration file. By default, this is “ceres.ini.” If the configuration file is not found, the settings will be reset to the default values.
The ‘Reset’ button resets the current configuration file to its default values. Resetting the settings is recommended if generation errors occur or if the program is moved to a different location.
The ‘Fix Path in Config’ button corrects the paths to resource files in the configuration file. These paths are replaced with the correct standard file paths for the current generator location. This operation is necessary if the generator folder is moved to a different location or if the configuration file from another copy of the generator is used.
About tab
Contains information about the program’s name, version, author’s contact information, and registration email.
Clicking “User Guide” will open a browser with the user guide (you’re reading it now :).
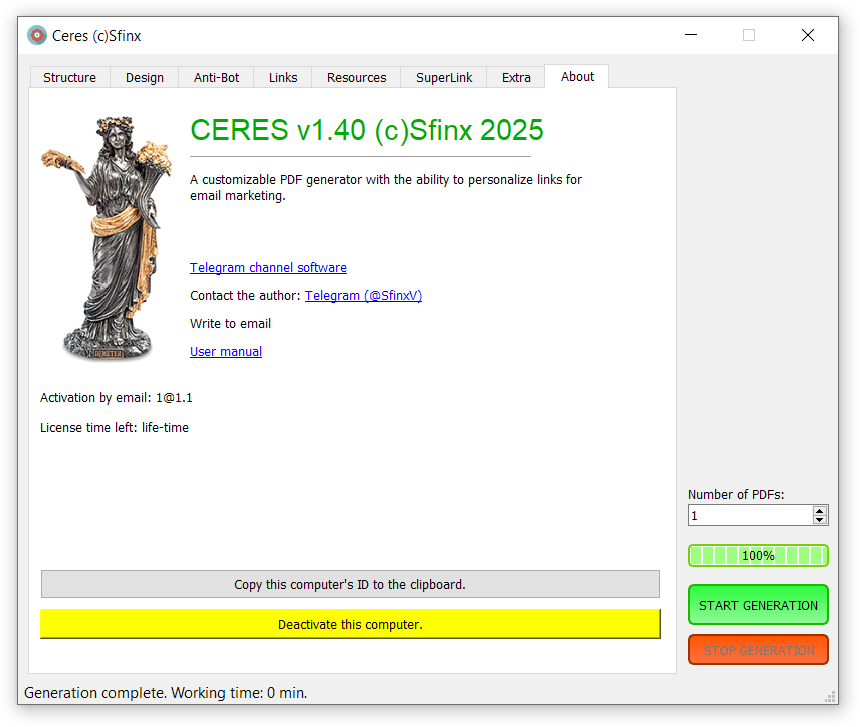
The remaining license days are also displayed here, or the message ‘License time left: lifetime’ is displayed for a perpetual license. This information is not immediately available after launch. It will appear after the first click on the “Start GENERATION” button.
This tab also contains two technical buttons.
«Deactivate this computer»
Clicking this button will deactivate (unlink) your copy of the generator on the current computer. Deactivation is possible no earlier than 30 days after initial activation. For more information, see the “Program Registration and Activation” section.
«Copy this computer’s ID to the clipboard.»
Copies your computer’s unique identifier to the clipboard. This may be necessary in some problematic situations when contacting the author to expedite resolution.
Description of input data files
The screenshot below shows the contents of the program’s resource subdirectory “pdf_res”.
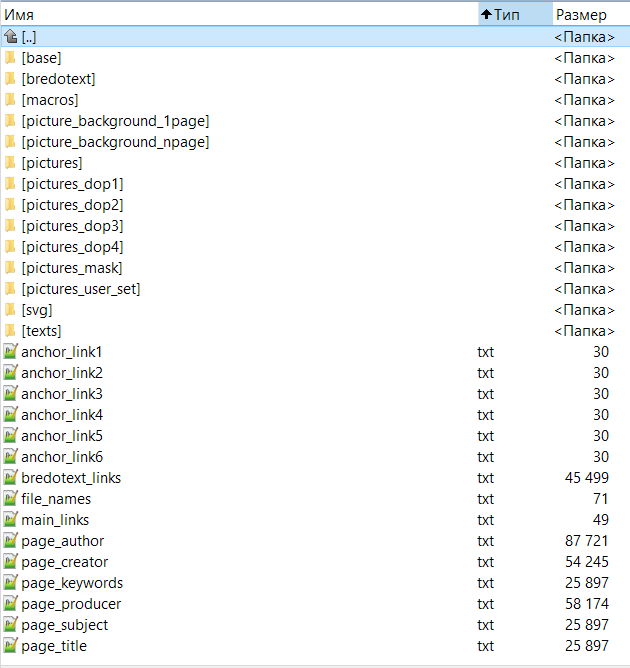
Subdirectories:
[base] – By default, this file contains a database of email addresses, “email-base.txt,” and a file with stop words for filtering the database, “email-stopwords.txt.” An additional file for filtering the database by foreign dating topics, “email-stopwords_dating_for_men.txt,” contains stop words and foreign female names and allows you to remove women’s emails (as well as related and abusive email addresses) from the input file.
[bredotext] – upload files here from which text is extracted line by line to generate bredotext. Each line forms a paragraph in the bredotext (ending with a line break character – a paragraph). You can upload a literary work or a report of some kind 🙂
[macros] is a directory containing file macros. The generator comes with 7 ready-made file macros. You can create your own file macros. For more information, see the next section, “Description of Generator Macros.”
Important! The generator ONLY works with raster graphic files (images, photos) in the JPG and PNG formats (files must have these extensions). Transparency in PNG files is allowed, but will be removed during processing by the generator. These requirements apply to all raster graphics (images and photos) used in the generator. Images with the JPEG extension may cause the generator to error, and the output directory for PDF files will be empty.
[picture_background_1page] – From this subdirectory, images are randomly taken to be placed on the background of the first page (JPG, PNG, SVG).
[picture_background_npage] – From this subdirectory, images are randomly taken to be placed in the background of subsequent pages (JPG, PNG, SVG).
[pictures] – Images for the first page are randomly selected from this subdirectory. Subdirectories are not processed. Use only image formats with JPG and PNG extensions.
[pictures_dop1] – Images for additional pages are randomly selected from this subdirectory. These images are placed first (in the one-, two-, and four-photo-per-page variants) and are linked to additional links from the “anchor_link1.txt” file.
[pictures_dop2] – Images for additional pages are randomly selected from this subdirectory. These images are placed second (in the two- and four-photo-per-page variants) and are linked to additional links from the “anchor_link2.txt” file.
[pictures_dop3] – Images for additional pages are randomly selected from this subdirectory. These images are placed third (in versions with four photos per page) and are linked to additional links from the “anchor_link3.txt” file.
[pictures_dop4] – Images for additional pages are randomly selected from this subdirectory. These images are placed fourth (in versions with four photos per page) and are linked to additional links from the “anchor_link4.txt” file.
[pictures_mask] – This subdirectory contains images for the generator’s masking functions.
[pictures_user_set] – This subdirectory contains additional graphic files for use in HTML markup. The purpose of these files will become clear after reading the section “Description and Examples of Acceptable HTML Markup.”
[svg] – A subdirectory containing vector files of graphic primitives for additional pages in *.svg format. For more information, see the description of the “01. Generation from Graphic Primitives” option.
[texts] – One file is randomly selected from this subdirectory of text files, from which the main text on the first page is generated. A new file is selected for the new PDF. Spintax, macros for passing parameters to the generated text, and some HTML tags are available. For a detailed description of the input text format and macros, see the “Input Text Description and Examples of Acceptable HTML Markup” section below.
Attention! All text files must be encoded in UTF-8 and contain Windows hyphenation (CR LF)!!!
Files: {anchor_link1.txt}, {anchor_link2.txt}, {anchor_link3.txt}, {anchor_link4.txt}, {anchor_link5.txt}, {anchor_link6.txt} – Files with additional links, four of which are automatically linked to images on additional pages. All six of these additional links—anchors—can be used via macros when generating the main text. They are randomly selected from files and are not deleted.
{bredotext_links.txt} – A file with cloaking or “junk” links. These links are attached to gibberish text and graphic primitives in the generated PDF. They are randomly taken from the file and not deleted.
{file_names.txt} – A random string is taken from this file to generate the PDF file name when writing. This is used when the “2. Take name from file and append a serial number” option is enabled.
{main_links.txt} – A file with primary links. They are selected line by line, either randomly or sequentially. They are automatically assigned to the first page image, to the entire first page, or inserted into the main text using the &link& macro.
The remaining six files are needed to generate metadata for PDF files. They are also used to further customize the resulting PDFs. These files are used by default. You can select others in the “Resources” tab. If you’re creating a PDF for a white label email campaign, you can use page_keywords, page_subject, and page_title to provide a real description of the product, service, or offer. This information is used for searching, indexing, and analyzing PDF files both in operating systems and online, and, of course, by email service analytics systems.
IMPORTANT! All META tags must contain ONLY LATIN SYMBOLS!
ATTENTION! Before starting work, it is advisable, but not required, to edit the metadata files to suit your needs and objectives. I also strongly recommend replacing the contents of files containing gibberish, spam cloaking links, and output PDF names—in short, anything that might even slightly overlap with the output of another software client.
{page_author.txt} – from it, lines for the “Author” meta tag are randomly taken.
{page_creator.txt} – from it, lines are randomly taken for the “Creator” meta tag.
{page_keywords.txt} – Lines for the “Keywords” meta tag are randomly selected from it. A single line can contain multiple keywords separated by spaces. If you’re disguising a mass mailing, it’s best to either leave the file empty or generate a very large number of lines (you can also use a literary work or very large lists of things).
{page_producer.txt} – from it, lines for the “Producer” meta tag are randomly taken.
{page_subject.txt} – from it, lines are randomly taken for the “Subject” meta tag.
{page_title.txt} – from it, lines are randomly taken for the “Title” meta tag.
IMPORTANT! Data files can be commented out, meaning lines that exist in the file but are not processed by the program are ignored. This is done for convenience—for example, you might want to temporarily stop using certain lines from the input files, but not delete them completely, as you might need them again later. Commenting out a line (making it ignored by the generator) is accomplished by inserting the hash symbol # at the beginning of the line.
Example of an active line: sample_email@mail.com
An example of a commented (inactive) line: #sample_email@mail.com.
Some of the data file names are strictly fixed, while others can be selected through the interface in the dialogs of the Resources tab.
Description of the generator macros
Macros for inserting links from files:
&link&– inserts a link from the main links file “main_links.txt”;&anchor1&– inserts a link from the additional links file “anchor_link1.txt”. These links are also added to the first images on additional pages. These points have already been described.&anchor2&– inserts a link from the additional links file “anchor_link2.txt”.&anchor3&– inserts a link from the additional links file “anchor_link3.txt”.&anchor4&– inserts a link from the additional links file “anchor_link4.txt”.&anchor5&– inserts a custom string from the file “anchor_link5.txt”. This anchor has a special feature. Since this (and the next) keyword aren’t used for automatically inserting links to objects (images) in the generated PDF file, you can use not only links but also any text. What you might use this for is up to you 🙂&anchor6&– inserts a random string from the file “anchor_link6.txt.” Usage is similar to the previous keyword &anchor5&.
Macro &&&text&&& to disable the HTML parser
To force the generator to treat the input file as plain text, add the macro &&&text&&& to the first line of the file. In plain text mode, don’t force line breaks with the <br> code or wrap the text in the paragraph tag <p></p>. Line alignment, setting the text font size, inserting hyperlinks (masking links with text), and other HTML attributes will be unavailable.
Macro &MASK_text& for masking a block of text “text”
This can make it difficult for email clients to parse a masked text block (word) called “text.” Words are broken into parts. This can help hide spam-triggering words (such as Crypto, Cryptocurrency, Porn, Porno, Sex, Betting, Earnings, etc.) from email clients’ view.
Example of masking the word ‘Porno’: &MASK_Porno&
Macros for generating a random value on each call to RND
If you use the same macro several times within the same email text, different generated values will be inserted in its place.
&RNDNUM-A:B&– inserts a random number from the range A to B, where A < B and are integers.&RNDSTR-A:B&– inserts a random string of Latin characters (a-z, lowercase) with a length equal to a random number from the range A to B, where A is less than or equal to B and are integers.&RNDSTRUP-A:B&– inserts a random string of Latin characters (a-z, uppercase) with a length equal to a random number from the range A to B, where A is less than or equal to B and are integers.&RNDMIX-A:B&– inserts a random string of Latin characters and digits (a-z, lowercase, 0-9 digits) with a length equal to a random number from the range A to B, where A is less than or equal to B and are integers.&RNDMIXUP-A:B&– inserts a random string of Latin alphabet characters and numbers (a-z CAPITAL, 0-9 digits) with a length equal to a random number from the range A to B. Where A is less than or equal to B and these are integers.
Macros for generating a random value when calling FIX
If you use the same macro multiple times within a single block of email text, the same generated value will be inserted in its place everywhere.
&FIXNUM-A:B&– inserts a random number from the range A to B, where A < B and are integers.&FIXSTR-A:B&– inserts a random string of Latin characters (a-z, lowercase) with a length equal to a random number from the range A to B, where A is less than or equal to B and are integers.&FIXSTRUP-A:B&– inserts a random string of Latin characters (a-z, uppercase) with a length equal to a random number from the range A to B, where A is less than or equal to B and are integers.&FIXMIX-A:B&– inserts a random string of Latin characters and digits (a-z, lowercase, 0-9 digits) with a length equal to a random number from the range A to B, where A is less than or equal to B and are integers.&FIXMIXUP-A:B&– inserts a random string of Latin alphabet characters and numbers (a-z CAPITAL, 0-9 digits) with a length equal to a random number from the range A to B. Where A is less than or equal to B and these are integers.
File macros with values from FILE file strings
&FILE_FILENAME& – inserts a random string from a file named “filename.txt”. The file must be located in the “pdf_res\macros\” program subdirectory, be encoded in UTF-8, and have the “.txt” file extension. The file name must contain only Latin letters, numbers, the underscore “_”, and the dash “-“. If a file with the name specified in the macro is not found, nothing will be inserted in its place. You can create your own macros.
Ready-made file macros:
&FILE_FIRSTNAMES_FEMALE_ENG& – Insert an English female name&FILE_FIRSTNAMES_MALE_ENG& – Insert an English male name&FILE_SURNAMES_ENG& – Insert an English surname&FILE_FIRSTNAMES_FEMALE_RUS& – Insert a Russian female name&FILE_SURNAMES_FEMALE_RUS& – Insert a Russian female surname&FILE_FIRSTNAMES_MALE_RUS& – Insert a Russian male name&FILE_SURNAMES_MALE_RUS& – Insert a Russian male surname
Macros for inserting paths to PICTURE images
&PICTURE&– Inserts the full path and name of a randomly selected image from the “pictures” directory&PICTURE_DOP1&– Inserts the full path and name of a randomly selected image from the “pictures_dop1” directory&PICTURE_DOP2&– Inserts the full path and name of a randomly selected image from the “pictures_dop2” directory&PICTURE_DOP3&– Inserts the full path and name of a randomly selected image from the “pictures_dop3” directory&PICTURE_DOP4&– Inserts the full path and name of a randomly selected image from the “pictures_dop4” directory&PICTURE_USER_PATH&– Inserts the path (without the filename) to the directory containing additional user graphics “pictures_user_set”
Attention! Important information. When processing text with the HTML parser, an error occurs if the file path or file name contains spaces when using macros in the &PICTURE& group. Therefore, the program does not process files with spaces in their names and/or paths. Accordingly, the generator itself should not be located in a directory whose path contains spaces!
Macros for inserting service information (dates, times, uuid) SYS
&SYS_DATA_NOW1&– current date in “DD-MM-YYYY” format (International English) ’30-01-2024′&SYS_DATA_NOW2&– current date in “Day Month(full) Year” format ’30 January 2024′&SYS_DATA_NOW3&– current date in “Day Month(abbreviation) Year” format ’30 Jan 2024′&SYS_DATA_NOW4&– current date in “MM-DD-YYYY” format (US) ’01-30-2024′
&SYS_DATA_YESTERDAY1&– current date – 24-hour format “DD-MM-YYYY” (International English) ’29-01-2024′&SYS_DATA_YESTERDAY2&– current date – 24-hour format “Day Month(full) Year” ’29 January 2024′&SYS_DATA_YESTERDAY3&– current date – 24-hour format “Day Month(abbreviation) Year” ’29 Jan 2024′&SYS_DATA_YESTERDAY4&– current date – 24-hour format “MM-DD-YYYY” (US) ’01-29-2024′
&SYS_DATA_TOMORROW1&– current date + 24 hours in “DD-MM-YYYY” format (International English) ’31-01-2024′&SYS_DATA_TOMORROW2&– current date + 24 hours in “Day Month(full) Year” format ’31 January 2024′&SYS_DATA_TOMORROW3&– current date + 24 hours in “Day Month(abbreviation) Year” format ’31 Jan 2024′&SYS_DATA_TOMORROW4&– current date + 24 hours in “MM-DD-YYYY” format (US) ’01-31-2024′
&SYS_DAY_TODAY&– current day (number from 01 to 31)&SYS_MONTH_BIG&– current month name in full format “December”&SYS_MONTH_SHORT&– current month name in short format “Dec”&SYS_YEAR_TODAY&– current year (number like 2024)&SYS_DAY_OF_WEEK&– full name of the day of the week in the current default locale (Sunday, Monday, etc.)&SYS_TIME1&– current time in “Hours-Minutes-Seconds” format&SYS_TIME2&– current time in “Hours-Minutes” format&SYS_UUID&– random uuid generation (strings like “e00d28aa-5bb3-4923-88b1-ec60fd9ceb7e”)
Macros for inserting the values of the current email data fields from the imported EMAIL_ database (in SuperLink mode)
&EMAIL_EMAIL&– email (in the form mail@mail.com)&EMAIL_LEFTPART&– email before the left @ (“mail” for “mail@mail.com”)&EMAIL_RIGHTPART&– email after the @ – domain (“mail.com” for “mail@mail.com”)&EMAIL_FULL_NAME&– full name&EMAIL_FN_LEFT&– left part of the full name (&EMAIL_FULL_NAME&) before the first space&EMAIL_FN_RIGH&– right part of the full name (&EMAIL_FULL_NAME&) after the first space&EMAIL_FIRST_NAME&– first name&EMAIL_LAST_NAME&– last name&EMAIL_NICK_NAME&– nickname&EMAIL_AGE&– age&EMAIL_GENDER&– Gender&EMAIL_MOBILE_PHONE&– Phone number&EMAIL_COUNTRY&– Country&EMAIL_STATE&– State (province)&EMAIL_ZIP&– Postal code&EMAIL_CITY&– City&EMAIL_DATE_OF_BIRTH&– Date of birth&EMAIL_LANG&– Language
An example of email macros for a row of an imported database (it is in the generator’s example file):
Caroline-Hoffner@gmail.com,Caroline Hoffner,+1(800)000-0015,female,state-15,city-15

Description of the input text and examples of acceptable HTML markup
In this section, we’ll discuss the input text files from which the PDF text content is created. They are located in the “/pdf_res/texts/” subdirectory and must be in Windows format (CR LF) with UTF-8 encoding and a “.txt” extension. The generator will randomly select a file from this folder to generate a single PDF file.
These files can be:
- Plain text files
- Contain basic HTML markup.
To force the generator to use the input file as text, add the macro &&&text&&& to the first line of the file. In plain text mode, don’t force line breaks with the <br> code or wrap the text in the paragraph tag <p></p>. Line alignment, setting the text font size, inserting hyperlinks (masking links with text), and other HTML attributes will be unavailable.
If such a macro isn’t present, the input text is processed by the HTML parser by default. You can use both HTML and plain text files simultaneously, as the macro only affects the current file and one PDF generation, respectively.
Supported HTML tags
- <h1> to <h8>: headings (align attribute)
- <p>: paragraph (align, line-height attributes)
- <b>, <i>, <u>: bold, italic, underline
- <font>: font with face, size, and color attributes
- <center> to center the text
- <a>: links( href attribute)
- <pre> & <code> tags
- <img>: images with src, width, height attributes
- <ol>, <ul>, <li>: ordered, unordered and list items (can be nested)
- <dl>, <dt>, <dd>: description list, title, details (can be nested)
- <sup>, <sub>: superscripts and subscripts
- table with align, border, width, cellpadding, and cellspacing attributes
- <thead>: optional tag, wraps the table header row
- <tfoot>: optional tag, wraps the table footer row
- <tbody>: optional tag, wraps the table rows with actual content
- <tr>: strings with align, bgcolor attributes
- <th>: table header cell with align, bgcolor, width attributes
- <td>: table cell with align, bgcolor, width, rowspan, and colspan attributes
Restrictions
The HTML parser does not support some nested tag configurations. For example:
- <table> a table cell can contain <td><b><em>nested tags that form a single text block</em></b></td>, but should not contain <td><b>arbitrarily</b> nested <em>tags</em></td>
Let’s look at some HTML tags and techniques
To insert line breaks into a new paragraph, you must explicitly include the <br> tag at the end of the line— this is the forced line break tag.
You can use the following tags (in combination with macros) to format your text:
<center>Place this TEXT in the center</center><br>
<br>
<p>This is the text in a paragraph. An automatic line break will be inserted at the end. Text wrapped in the 'p' tag does not require a 'br' tag at the end to create a line break.</p>
<b>Bold text</b>
<i>Italics</i>
<u>Underlining</u>
<font color="#00ff00"><p>This text will be written in green.!</p></font>
<font color= "#000000" size="&RNDNUM-15:20&"><center>TEXT black centered</center></font>
In this example, the text “TEXT” will be centered on the page, written in black, and have a random font size between 15 and 20. This means that in addition to setting the font size in the settings, you can also explicitly specify the font size in the text itself. And if you embed a number generation macro, you’ll get another floating font size.
<a href="&anchor1&">Hyperlink</a>A hyperlink can be used to visually disguise a link. Macros can also be used within a hyperlink to define links. For example:
<a href="&link&">Click HERE!!!</a> <a href="&anchor1&">Click HERE also!!!</a>Text tags for bold, italic, and underline can be combined:
<b><i>Bold italic</i></b><br>
<u>Underlining</u><br>
<b><u>Bold underline</u></b><br>
<i><b><u>Bold italic with underline</u></b></i><br>
To create a horizontal line across the entire width of the page
We insert a table into a cell of which we insert a picture with a long line at 100% of the page width (it can be reduced):
<table width="100%">
  <tr>
    <td>
      <img src="&PICTURE_USER_PATH&{line-black-2px.gif|line-gray-2px.gif|line-orange-2px.gif}">
    </td>
  </tr>
</table>
Here, the &PICTURE_USER_PATH& macro inserts the path to the “pictures_user_set” directory. The syntax {line-black-2px.gif|line-gray-2px.gif|line-orange-2px.gif} leaves only one filename for the horizontal line image.
I prepared 10 files with lines of different colors, plus a source file in Adobe Photoshop format for creating additional ones. They are located in the “pictures_user_set” directory.
Insert your image in the center of the page at 50% of the page width
Inserting an image named “picture_file.jpg” at 50% of the page width, previously placed in the “pictures_user_set” subdirectory:
<table width="50%">
  <tr>
    <td>
      <img src="&PICTURE_USER_PATH&picture_file.jpg">
    </td>
  </tr>
</table>
Insert an image in the center of the page at 25% of the page width
Insert a random image from the “pictures” directory into the center of the page at 25% of the total page width:
<table width="25%" align="center">
   <tbody>
	<tr>
	  <td><img src=&PICTURE&></td>
	</tr>
  </tbody>
</table>
Insert the day of the week and date, aligned to the right edge of the page, in a font size ranging from 10 to 14 points.
<p align="right"><font size="&RNDNUM-10:14&">Sales Receipt date: &SYS_DAY_OF_WEEK&, &SYS_DATA_NOW2&</font></p>
An example of a white text on a blue background (based on a table)
Here, in the <table width=”100%”> parameter, you can change the width of this blue block. For example, 75% of the width, 50% of the width, etc.
<table width="100%">
   <tbody>
	<tr>
	  <td bgcolor="#000080" align="justify"><font color="white"><b>
	  Lorem ipsum dolor sit amet, consectetur adipiscing elit. Quae cum ita sint, effectum est nihil esse malum, quod turpe non sit. Itaque nostrum est-quod nostrum dico, artis est-ad ea principia, quae accepimus. Quod totum contra est. Duo Reges: constructio interrete. Atqui iste locus est, Piso, tibi etiam atque etiam confirmandus, inquam.
	  </b></font></td>
	</tr>
  </tbody>
</table>
An example of a 4-cell table with text formatting from the center of the page
The top right cell of a table with a green background and white text.
<table width="100%">
   <tbody>
	<tr>
	  <td align="right">1 Sample</td>
	  <td bgcolor="#00ff00" align="left"><b>Alice</b></td>
	</tr>
	<tr>
	  <td align="right">2 Long long sample line</td>
	  <td align="left"><font color="#00ff00"><b>Bob Chipesku</b></font></td>
	</tr>
  </tbody>
</table>
A small yellow line down the center of the page (without using a picture)
<font color="yellow" size="12"><center>————————————</center></font>
<br>
Example of a closing inscription at the bottom center of the page (for letterheads)
<p align="center"><font size="&RNDNUM-9:10&">
Copyright ©2024. All rights reserved.<br>
Terms of Use  |  Privacy Policy  |  Sales and Refunds
</font></p>
Inserting an image from the Internet into the center of the page
Inserting an image from the Internet at 10% of the page width:
<table width="10%">
   <tbody>
	<tr>
	  <td><img src="https://upload.wikimedia.org/wikipedia/commons/7/70/Example.png"></td>
	</tr>
  </tbody>
</table>
The “/pdf_res/texts/Samples/” subdirectory contains several example files. The “text-table-1.txt” file contains examples describing how to call external images, format them, and use PICTURE macros.
Reference information
See HTML tags for special characters here.
See color codes with examples here. Use the values in the “Hexadecimal” column to set the text color and background color.
Experiment and try things out.

Example of input text with spintax and macros:
{Im|I am|I'm} &FILE_FIRSTNAMES_FEMALE_ENG& &FILE_SURNAMES_ENG&.<br>
{I would like|I want} {to share something with you.|to choose you.}<br>
{I am a very interesting girl. | ..| |}<br>
<br>
<a href=»&link&»>Click HERE!!!</a><br>
<br>
<font color=»#00ff00»><p>Hello in green</p></font>
<br>
email - &email&, link - &link&<br>
anchor1 - &anchor1&<br>
anchor2 - &anchor2&<br>
anchor3 - &anchor3&<br>
anchor4 - &anchor4&<br>
anchor5 - &anchor5&<br>
anchor6 - &anchor6&<br>
<b>Bold text</b><br>
<i>Italics</i><br>
<b><i>Bold italic</i></b><br>
<u>Underlining</u><br>
<b><u>Bold underline</u></b><br>
<i><b><u>Bold italic with underline</u></b></i><br>
<a href=»&anchor1&»>Anchor1 text</a><br>
<br>
Important! Due to the initial processing of text using the Spintax construct, the curly brackets “{” and “}” are not passed through to the HTML parser (since they denote Spintax). To display these characters, they must be escaped by preceding them with a backslash “\”. This means that to output the curly brackets in the final text, you must use “{” and “}”.
Embedding Ceres into Workflows and Configuration Management
Starting with version 1.10, Ceres now supports configuration files. In addition to significantly improving usability, this functionality opens the way for the generator to be used in complex traffic generation systems. These systems can be composed of various software packages and designed to automatically create and send emails to pre-prepared recipient lists without operator intervention. Such systems can include, for example, an AMS using a mailing scheduler, ZennoPoster and BAS scripts, and, of course, custom software. The only limitation for integrating the Ceres generator into such a system is that it must run on a Windows OS (home computer, VDS, or VPS).
What does the integration look like in general? In Ceres, PDF generation parameters are pre-configured, and autostart and auto-exit modes are enabled at startup. Then, configure the Task Scheduler (a powerful tool built into Windows for launching programs and other tasks) to run the generator, say, once a day. At the designated time, the scheduler launches Ceres. Ceres executes the task and creates a new set of PDF files. Your mailing list continues sending emails with attachments, but now uses the new PDFs, complete with new elements, redirects, text, meta tags, and more. I’ll describe the setup in detail a bit later, but for now, let’s look at working with configuration files.
Working with configuration files from the program interface
Now, Ceres can remember all generation parameter and operating mode settings, eliminating the need to reconfigure them each time the program is launched. Upon startup, the software automatically reads the configuration from the file. Upon exiting the program, the software also automatically saves the current configuration in the configuration file.
The following configuration operations are available from the ‘Extra’ tab of the program interface:
- Save — Saves the current generator settings to the configuration file. By default, this is the file ‘ceres.ini’ in the generator folder.
- Load — Loads the generator settings from the configuration file. By default, this is ‘ceres.ini’. If the configuration file is not found, the settings will be reset to the default values.
- Reset — Resets the current configuration file to the default values.
- Fix Path in Config — Corrects the paths to resource files in the configuration file. These paths are replaced with the correct standard file paths for the current generator location. This operation must be performed if the generator folder is moved to another location or if the configuration file from another copy of the generator is used.
Integrating Ceres into Workflows
To run the generator from an external environment (Windows Task Scheduler or your own mailing software), all you need to do is:
- Configure the generated PDF configuration;
- Enable the “Run generation at startup” and “Exit after generation” options on the Extra tab;
- If you need to perform any additional actions before starting generation, enable the “Run an external program before generation” option and select that program. Or edit the default launch file ‘_start.bat’;
- If you need to perform any additional actions after generation is complete, enable the “Run an external program after generation” option and select that program. Or edit the default launch file ‘_final.bat’;
- Save the configuration explicitly by clicking the “Save” button, or the program will do this automatically upon exit;
- Configure the Windows Task Scheduler to run the generator periodically. Or configure third-party (or your own) software to launch the generator when needed.
To disable automatic exit after PDF generation, uncheck the “Exit after generation” checkbox on the Extra tab BEFORE the generation process completes. Alternatively, you can reset the configuration in two ways: 1) by clicking the reset button in the interface, or 2) by deleting the ‘ceres.ini’ configuration file. A new one with default settings will be created upon startup.
Configuring Windows Scheduler
There’s plenty of information on this topic online, so I won’t repeat it here.
I’ll add that if you need to run the generator several times per day, simply create the appropriate number of scheduler tasks, as the minimum recurrence interval with standard tools is once per day. Consider the time it will take the generator to create the specified number of PDF files (by manually generating the first PDF, recording the elapsed time, and increasing it by at least 10-20% to cover for heavy computer load at that time). Avoid creating a situation where the scheduler launches a new instance of the generator while the old one is still running.
Using CERES in conjunction with AMS Enterprise
And finally, how to use the unique ability to generate PDFs with embedded personalized links and personalized messages.
PDF files won’t send themselves to recipients, so you need software that can handle personalized attachments. This means sending recipients a file attached specifically to them. Such software exists, including the well-known AMS Enterprise.
When working in SuperLink mode, Ceres creates a .csv file in the output directory in addition to PDF files (if the “Write email and PDF name mapping file” option is enabled).
This file will serve as the link between the sender and the generated PDFs, matching the file name for the attachment to the recipient’s email address.
So, we have generated PDFs and a corresponding CSV file (created for a pre-prepared email list).
Launch AMS. Go to “Mailing Lists.” Create a new list or clear the existing one.

Click the “Upload” button, select the CSV format and comma-separated values. Click “Continue.” Select the Ceres-generated .csv file.
A window will appear where we need to match the fields in the internal AMS database with the fields from our uploaded file. We have two such fields: one for the email address, and the other for the file name corresponding to that address.
So, first, select the Email field and assign it the email value from the drop-down list on the right.

Next, select an unused field in your mailing list on the left. For example, let’s say it’s the “HomeAddress” field.

In the right window (Incoming Fields), select the second field from our loaded list, which contains the PDF file name (for example, ’email’ + ‘.pdf’).
Click OK. AMS loads the data and displays the loading statistics. OK. Now we see that each email address in our list has a corresponding file name:

Great. Now let’s go to the email editor and create a new email or select an existing one.
In the editor window that opens, click “Add File” in the lower left corner of the “Attachments” section.
Select the “Personalized Attachment” attachment type.
In the list field containing file names, select our “Home Address.”
Next, select the directory (folder) containing the PDFs we’ve generated for the email and click “Continue.”

Then save and exit the email editor. That’s it! We’ve set up a mailing list with personalized attachments in the form of our PDF files.
To launch the mailing list directly, go to the main screen, select the list we created where we uploaded the CSV file from the address list. In the email field, select our prepared email with the personalized attachment. After configuring everything else, click “Start,” and enjoy the results!

Terms of purchase and use
For generator purchase terms and current promotions, visit the software channel. To purchase the generator, contact the author on Telegram or by email.
The program is installed on one computer and is bound to the current computer configuration. Therefore, significant changes to the computer configuration will cause the issued license to become inoperative.
You can rebind the license yourself at intervals of at least 30 days (in this case, the author will still be required to obtain a new key for the other computer; you will simply perform the license unbinding procedure yourself).
In emergency cases (such as changing the computer configuration or reinstalling the operating system), please contact the author.
Suggestions for improving functionality are accepted by contacting the author in a clear manner. If your suggestions are interesting, useful, and feasible, they may appear in future versions of the program.
Registration and activation of the program
When you first launch the program, it will display a window warning you about the unregistered version and the computer identifier (ID).

Left-click on this window, then press CTRL-C to copy the text in this window to the clipboard along with the computer ID.
Send this text to the developer. Also provide your valid email address (the program will be registered to this address).
You will then receive a key file for the PDF generator named “cereskey.dat.” Place this file in the program directory and do not delete it afterwards! Re-launch the program. A window will appear informing you of successful registration. The generator will then launch.
When you first start generating PDFs, the program will ask you to enter your email address for activation. Enter the same email address you provided to the developer when you purchased the program.
Then click on the “Start GENERATION” button to finalize the program activation.
When running, the program communicates with the activation server. Therefore, an internet connection is required for its operation.
The “About” tab also displays the remaining license days, or the message “License time left: lifetime” for a perpetual license. This information is not immediately available after launch. It will appear after clicking the “Start GENERATION” button.

The program can be transferred to another computer, but not earlier than 30 days after installation. To do this, first deactivate the copy you want to deactivate by clicking “Deactivate this computer” on the “About” tab.
If 29 days or less have passed since the initial activation, the deactivation operation will fail. If deactivation is successful, the program will notify you and exit.
Do not uninstall this installed program if you plan to reactivate it later! This will allow you to deactivate and reactivate these previously installed versions of the program on different computers (after 30-day hold periods) without the program’s author’s involvement.
После деактивации скопируйте установочный дистрибутив на другой компьютер и проведите первичную процедуру регистрации нового оборудования как описано в начале этого раздела.
So, here’s how it works on different computers. For example, you have a program installed on your home desktop computer. You’re going on a trip and taking your laptop with you. To install the program on your laptop, you first deactivate the program on your home desktop computer. Then, you copy the distribution to your laptop, run the program for the first time, and contact the author to register the new hardware (send them the new computer ID and the email address you used to purchase the program). The author completes the registration and gives you a new key. You register a copy of the program on your laptop with this key (simply by placing the key in the program folder). Then, when you first start generating the program, enter your email address (activation) and use the program on your laptop. Upon returning from your trip (at least 30 days in duration :), you deactivate the copy on your laptop. Then, simply run the copy on your desktop computer again, enter your email address, and use the program on your desktop computer without contacting the author or getting new keys. You can install the program on multiple computers, but you can only use it on one of them. You can change your working computer no more than once every 30 days.
ATTENTION! The program is tied to the current computer configuration. Changing it will block the program! Also, do not attempt to transfer the registered program to another computer—it will not work anywhere other than the computer on which it was initially activated. If an attempt to bypass the protection is detected, the program may be blocked and you will lose your license!
Due to the way resources are protected and packaged, some antivirus programs may complain about the program’s executable file.
ATTENTION! If you copy a previously run program folder to another location on your computer or move it to another computer, click the “Reset” button in the “Extra” tab of the “Settings” section to reset the settings. Otherwise, the generator may not work due to incorrect paths to working folders and files.
FAQ – Frequently Asked Questions
How many computers can I run the PDF generator on simultaneously?
The PDF generator is tied to the hardware configuration of the computer on which it was activated. Therefore, the generator only works on the computer where it was initially activated.
Can I run the PDF generator without an internet connection?
No, you can’t. When each generation starts, the program contacts the license server and receives permission to continue running. Without an internet connection, the program simply won’t work.
Is it possible to move the generator folder to another location on the same computer?
Yes, you can. However, after the transfer, you must click the “Fix Path in Config” button, located in the “Settings” section of the “Extra” tab. This is necessary to initiate the path correction process in the generator settings file.
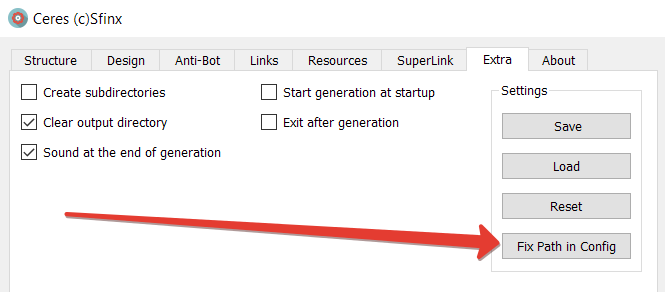
What image extensions can be used with the PDF generator?
The generator works ONLY with raster graphic files (images, photos) in the JPG and PNG formats (files must have only these extensions). These requirements apply to all raster graphics (images and photos) used in the generator. Images with the JPEG extension may cause the generator to fail, and the output directory for PDF files will be empty. If you need to use specific graphic files in formats not supported by the generator, first convert them to a supported format. This can be done using any online graphics converter.
I run the generator, but it doesn’t create a PDF file. What could be wrong?
There could be several reasons why a file (or files) might be missing after running the generator. All of these reasons could be present simultaneously:
- Incorrect paths in the “ceres.ini” configuration file. This occurred after moving the program directory from another location. To fix this, click the “Fix Path in Config” button located in the “Settings” section of the “Extra” tab.
- Among the images you added to the generator’s input directories, in addition to the correct JPG and PNG formats, there are other graphic formats. Specifically, files with the JPEG, BMP, GIF, TIFF, and other graphic formats. Remove all formats unsupported by the generator and leave only files with the JPG and PNG extensions.
- The text files input to the generator contain unsupported encodings. Check all text files you added yourself. All text files must be encoded in UTF-8 and have Windows-standard hyphenation (CR LF).
If you don’t have any of the above issues, or you’ve eliminated them but the PDF file still isn’t being created, please contact the program’s author and send them the “ceres_log.txt” file from the generator folder. We’ll work together to figure out the cause. You can also review the “ceres_log.txt” file yourself—it might help you find the cause.
Can I run multiple copies of the PDF generator on one computer at the same time?
Yes, you can. Place copies in different locations and run each one separately. The program is tied to a specific computer, but there’s no limit on the number of copies that can be running simultaneously. By running multiple copies, you can improve overall PDF generation performance, provided your computer configuration is sufficiently powerful.
For example, you can use one copy to generate large quantities of PDFs, while the second copy generates individual PDFs for ongoing testing.
Why does my antivirus complain about the PDF generator executable file?
The PDF generator is protected by special encryption (which ensures binding to the computer’s hardware and prevents modification of the program code), which some antivirus programs may mistakenly identify as malicious code. If this occurs, add the PDF generator executable file “Ceres_v1_40_prot_eng.exe” to your antivirus program’s exceptions.
Profits to all! Thank you for your attention!
For information on new versions, sample software, announcements, and promotions, visit the “Bulk Email software by Sfinx” Telegram channel. You can also find examples of generated PDF files, additional information on usage, pricing, and more. A link to the author of the PDF generator, “Ceres,” is available on Telegram.